Using the Web Editor App
The Web Editor app allows you to create multi-track audio / video sequences using cloud-hosted proxy media that has been uploaded to your Avid Content Core system. That means that you can create sequences based on assets from any Production Management or MediaCentral Asset Management system that is connected to Avid Content Core, regardless of the asset's original source, frame rate, or format.
The app is not limited to a cuts-only editing experience. The Editor includes controls that allow you to enhance your sequence by creating and adding titles, graphics, and transitional effects. You can also fine tune sequence audio levels by adding keyframes to individual audio track segments.
If you are working collaboratively with other members of your organization on the same project, the Editor app allows you to work on the same sequence at the same time with one or more other users. For more information on this feature, see Collaborative Editing.
Web Editor Homepage
When you click the Web Editor button in the ACC Fast Bar, the system displays the Web Editor homepage. From here, you can create a new project or select a project from a list of recent projects.
If you right-click on any of the recent projects, the system displays a context menu with the following additional options:
-
For information on the Duplicate feature, see Duplicating a Project.
-
For information on the Request a Review feature, see Using the Review and Approval App.
Web Editor Overview
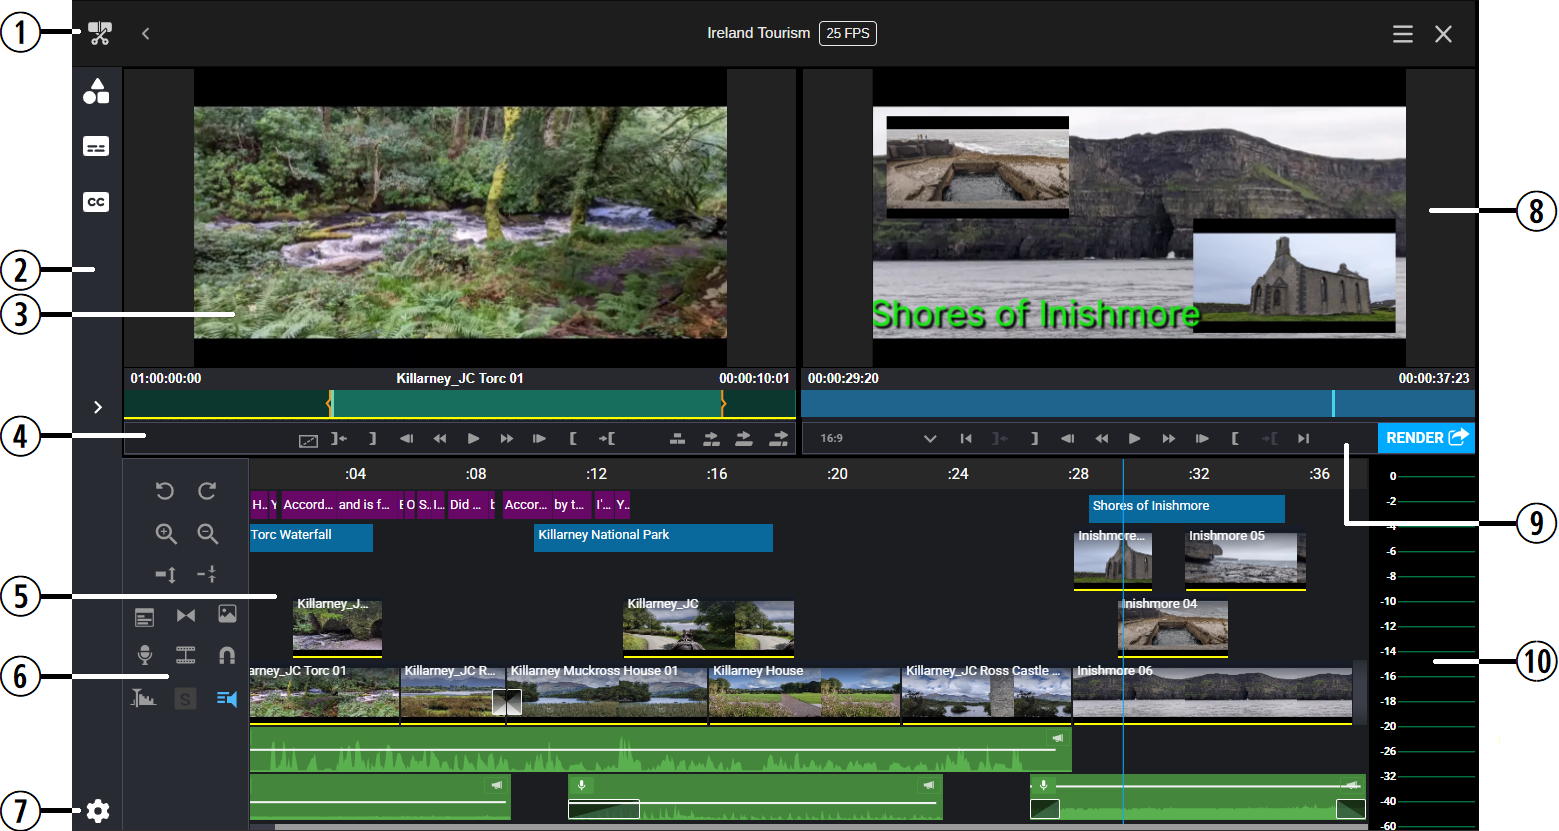
After you create a new project/sequence, or open an existing project/sequence, the main Web Editor user interface appears. The following illustration and table provide an overview of the app. For information on how to create your first project/sequence, see Creating a New Project and Sequence.
|
# |
Section |
Description |
|---|---|---|
|
1 |
App Header |
For more information, see Exploring the Web Editor App Header. |
|
2 |
Editor Sidebar |
Allows you to access the Project Bin to find content that is associated with your current sequence. The sidebar also includes controls that allow you to create graphic templates, transcripts, and closed captioning data. For more information, see Using the Editor Sidebar. |
|
3 |
Source Monitor |
Displays source assets that you can edit into your sequence. For more information, see Using the Source and Record Monitors. |
|
4 |
Source Monitor Controls |
Provides playback and editing controls that allow you to work with source assets. For more information, see Source / Record Monitor Controls. |
|
5 |
Sequence Timeline |
The timeline represents all of your sequence's edits and effects. You can use this area to further refine and manipulate the elements of your sequence. For more information, see Exploring the Sequence Timeline. |
|
6 |
Timeline Controls |
|
|
7 |
User Settings |
Includes controls that allow you to select a default keyboard layout, or alter the default keyboard shortcuts. For details, see Configuring the User Settings. |
|
8 |
Record Monitor |
Displays the output of your edited sequence. For more information, see Using the Source and Record Monitors. |
|
9 |
Record Monitor Controls |
Provides playback and controls for your edited sequence. For more information, see Source / Record Monitor Controls. |
|
10 |
Audio Meters |
For more information, see Working with Audio. |
For information on using keyboard shortcuts with the Editor app, see Keyboard Shortcuts.
Resizing the Monitors and Sequence Timeline
The Editor app allows you to resize the space allocated to both the Source / Record Monitors, and the Sequence Timeline.
n If open, you can also resize the amount of space allocated to the Player Monitor and tabs that are available to the right of the Editor app.
To resize the Source / Record Monitors:
-
Hover your cursor over the areas between the Source and Record monitors.
The separator bar turns blue and your cursor turns into a double-sided arrow.
-
Drag and drop the separator bar to a new position to alter the amount of space allocated to the Source / Record monitors.
The action resizes both monitors automatically and responsively. If you drag the separator bar to the left to increase the size of the Record monitor, the Source monitor decreases in size accordingly.
To increase or decrease the space allocated to the Sequence Timeline:
-
Hover your cursor over the areas between the Source / Record monitors and the Sequence Timeline.
The separator bar turns blue and your cursor turns into a double-sided arrow.
-
Drag and drop the separator bar to a new position to alter the amount of space allocated to the Sequence Timeline.
The action resizes both panels automatically and responsively.
Exploring the Web Editor App Header
Located at the top of the Web Editor app, the app Header includes the following controls.

|
# |
Name |
Description |
|---|---|---|
|
1 |
Back to Project List |
You can click this button to return to the Web Editor home page. Any changes that you have made to your sequence / project are saved automatically. |
|
2 |
Sequence Name / Frame Rate |
Displays the name of your sequence and the frame rate that is associated with this project. You can click this area of the header to display the same options that were presented during the project / sequence creation process. |
|
3 |
Context Menu |
Includes additional options for the Web Editor:
|
|
4 |
Close |
Closes the Web Editor app. |
Collaborative Editing
The Editor app allows multiple users to access and edit the same sequence at the same time. The Sequence Timeline shows the position of each user as they work in the sequence.
The following illustration shows three editors in the same sequence. Each user is represented with a different position bar with their user initials appearing in the timing bar. The blue position indicator bar always represents the local user (you).
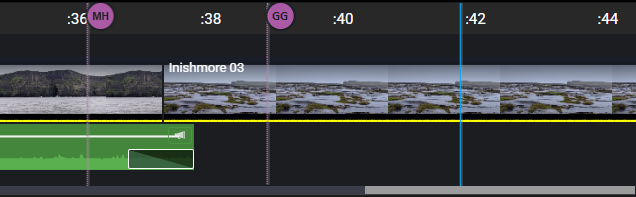
Edits are displayed in the timeline for all users as they occur. Edits from one user can be modified or deleted by any other user in the same sequence. The system saves a single undo stack for each sequence for all users. This means that it is possible for you to undo (Ctrl+Z) the edit of another user.
The collaborative editing workflow is most useful when you have a sequence that can be divided into responsibility areas. In one example, you might have a long sequence in which one user takes the first half, and another user works on the second half. Alternatively, you might have a workflow that involves one user that focuses on editing the Main track, while another user adds content to additional tracks or focuses on graphics or audio work. As with any collaborative workflow, communication between the users is important to success.