Exploring the Sequence Timeline
The Sequence Timeline provides a detailed view of the sequence and includes additional controls that allow you to modify or obtain more information about the sequence.
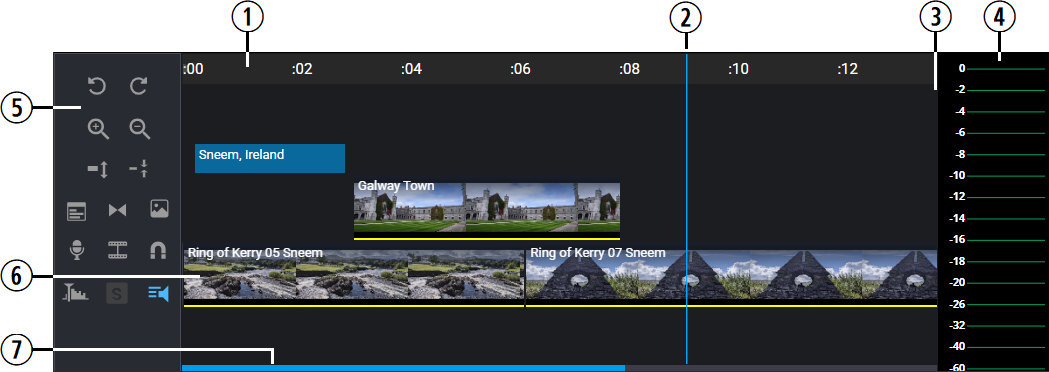
The following illustration and table describe the different areas of the timeline.
|
# |
Section |
Description |
|---|---|---|
|
1 |
Sequence Timing |
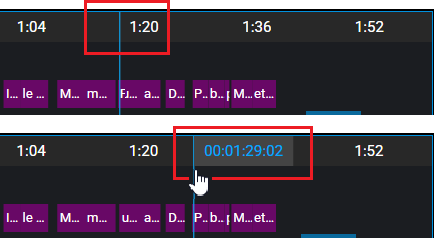
Displays the length of the sequence in minutes and seconds, starting at 00:00. If your sequence is longer than an hour, the timeline continues to display minutes and seconds only. For example, a sequence that is 1 hour, 23 minutes, and 25 seconds would be displayed as 83:25. If you click on a new point in the timeline or use your mouse to drag the position indicator left or right, the app displays a box with the exact timecode position. The following illustration shows the position indicator parked and then shows the position indicator being dragged to a new point in the timeline.
|
|
2 |
Position Indicator Bar |
Your current position in the sequence. The bar not only marks your current position in the timeline, but also acts as a virtual Mark In point for edits to the timeline. |
|
3 |
Vertical Scroll Bar (not shown) |
If your sequence includes a large number of tracks or if you use the Increase Track Height feature to the increase the size of the tracks to a point where some are hidden from view, a vertical scroll bar appears to the right of the timeline to enable access to these areas of the sequence. |
|
4 |
Audio Meters |
For more information, see Working with Audio. |
|
5 |
Timeline Controls |
|
|
6 |
Main Track |
The Main track is your lowest video track in the sequence. The timeline displays a grey bar for any areas of the Main track that are not populated with assets. This highlighted area can help you identify the Main track in more complex sequences with many vertical layers. While the Main track is always the lowest track, it is possible to edit assets over this track and then delete the underlying asset on the main track. In this case the assets on "V2" are not dropped down to the Main track. |
|
7 |
Zoom Bar |
If you click the Zoom In button to magnify the sequence, the zoom bar appears below the timeline. You can click and drag the zoom bar horizontally to navigate to different areas of the sequence. |
Timeline Toolbar Controls
The following buttons apply to functionality that is available in the Sequence Timeline.
|
Icon |
Name |
Description |
|---|---|---|
|
|
Undo |
Allows you to revert your last change to the timeline. For more information about this feature, see Automatic Sequence Saving. |
|
|
Redo |
If you used the undo function, redo restores the last change to the timeline. |
|
|
Zoom In |
Click the Zoom In button to magnify the timeline so that you can work more easily with long clips. If you have zoomed in to a section of the sequence timeline, and you perform an edit that includes material beyond the zoom region, the zoom region moves to display the position indicator. The size of the zoom region does not change. |
|
|
Zoom Out |
Click the Zoom Out button to see more of the sequence timeline on-screen. |
|
|
Increase Track Height |
Used in conjunction with the Expand All Audio Tracks feature, this button allows you to increase the vertical size of all audio tracks to allow for a more detailed view of the audio levels. This feature does not impact the height of the video tracks. If you increase the size of the tracks, all audio tracks are effected. |
|
|
Decrease Track Height |
This decreases the size of the tracks as shown in the expanded view. You do not need to click the Expand / Collapse button before decreasing the track height; the tracks display the new size when you next access the Expanded track view. Both the Increase Track Height and Decrease Track Height feature have a maximum size limit. When you reach that limit, the button is greyed out. |
|
|
Open Clip Inspector |
Allows access to various video effects, such as transform and color correction. For additional information, see Using the Clip Inspector. |
|
|
Add Transition |
Allows you to add simple effects between segments, such as a dissolve. For additional information, see Adding Transition Effects. |
|
|
Insert Title |
Allows you to add a new graphic to your sequence. For additional information, see Adding Titles and Graphics. |
|
|
Record Voice-over |
Allows you to record and place voice-over audio tracks into your sequence. For additional information, see Recording a Voice-over. |
|
|
Blade |
The Blade button divides a segment into two parts at the position indicator. Users of Avid Media Composer might recognize this as the Add Edit button. |
|
|
Snap to Edge |
When dragging an asset above or below the Main track, this feature helps you snap the asset to the edge of another segment. |
|
|
Enable / Disable Audio Scrubbing |
For details, see Audio Scrubbing. |
|
|
UnSolo |
If you have soloed one or more audio segments in the timeline, this button globally un-solos all audio. If no audio segments are currently soloed, the button is greyed out. For additional details, see Working with Audio Segments. |
|
|
Expand / Collapse All Audio Tracks |
Expands the audio tracks for fine-tune adjustments. For additional information, see Expanding / Decreasing the Audio Track Size. |


