Using the Editor Sidebar
The Editor Sidebar is divided into the following three sections:
-
Graphics
For details, see Using the Editor Sidebar's Graphics Panel.
-
Transcripts
For details, see Using the Editor Sidebar's Transcripts Panel.
-
Closed Captioning
For details, see Using the Editor Sidebar's Closed Captioning Panel.
-
User Settings
For details, see Configuring the User Settings.
While each panel displays somewhat different information and includes different controls, all panels include a Search bar that allow you to find content within that panel.
Expanding, Collapsing and Resizing the Sidebar
 You can click the chevron that is located in the middle of the sidebar to expand or collapse it to the left side of the Editor app.
If you hover your cursor just to the right of the Sidebar, a blue bar appears and your cursor changes to a double-sided arrow. You can drag the panel left or right to resize this panel.
If you hover your cursor just above the Project Bin area, another blue bar appears and your cursor changes to a double-sided arrow. You can drag the panel up or down to resize this panel.
The Project Bin
The Project Bin is located at the bottom of each Editor Sidebar panel. The Bin displays a list of all assets that you have added to your project, as well as assets created within your project — such as audio voice-overs. You can display the content in one of two ways:
|
|
Grid View — Assets are displays as tiled images |
|
|
List View — Assets are displayed in an alphabetically ordered list |


If you select an asset in the Project Bin, additional controls appear at the bottom of the panel:
|
|
Open — Opens the selected asset into the Source monitor |
|
|
Remove from Bin — Deletes the asset from the Project Bin area. The actual source asset is not deleted from Avid Content Core. If the asset is used in the sequence, your sequence is unaffected by the removal of the source asset from the Bin. |
|
|
Rename Folder — Only appears when you select a folder. |


Organizing the Project Bin
The Project Bin adds all assets to the root directory of each project by default. However, you can create one or more folders to further organize the content. For example you might want to organize the content by asset type (video, voice-over, image, etc), by subject matter, or other.
To create a new folder:
-
 Do one of the following:
-
Click the Add a New Folder button in the Project Bin header.
-
Double-click an existing folder to navigate to it, and then click the Add a New Folder button.
This allows you to create a nested folder structure.
-
-
Enter a name for this new folder and then click the Create Folder button.
Navigating the Folder Structure
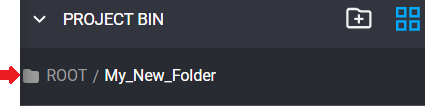
After you create a folder, you can double-click it to open the folder and display its contents. When you are in a sub-folder, the top of the Project Bin updates to reflect your current path.
Renaming a Folder
You can rename an existing folder at any time.
To rename a folder:
-
Click once on the folder in the Project Bin to select it.
-
 Click the Rename Folder button at the bottom of the Project Bin.
The Rename Folder dialog window appears with the existing folder name displayed.
-
Update the folder to your preferred name and click Save.
Moving Assets to a Folder
You can move any asset to a lower level folder within the Project Bin. However after you move the asset to the new folder, you cannot move it back to an upper-level folder (such as root). In this case, you can delete the asset from the subfolder, and re-add it back to the project to have it reappear in the root directory.
After you add an asset to a folder, the folder's tile updates to reflect the number of items that are included in that folder.
To organize the assets:
-
Drag and drop the asset from its current location to your desired folder.
Using the Editor Sidebar's Graphics Panel
 You can use the Graphics panel to create templates for both graphics and closed captioning. The panel is divided into two sections: Graphics and Captions. The following illustration shows the Graphics panel with the Captions tab in focus.
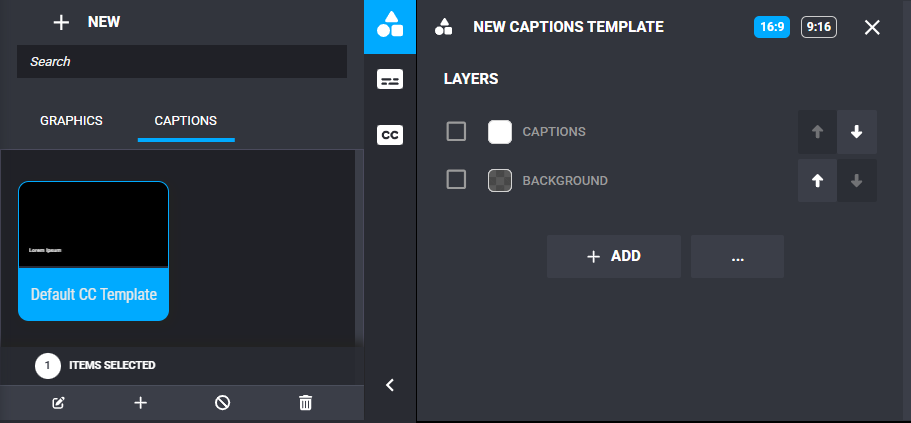
Left: Graphics panel. Right: Source monitor with default new caption settings.
The panel lists all graphic or closed captioning templates that you create through either the panel or the Graphics Designer. When you create a template, the template is available to all users across all projects / sequences.
c If you plan to add captions to your sequence timeline, you must create at least one Captions template before adding the caption track.
If you select an individual graphic or captions template from the sidebar, additional controls appear below the panel.
|
Icon |
Name |
Description |
|---|---|---|
|
|
Add to Timeline |
Adds the selected Graphics or Captions template to the timeline. |
|
|
Disable |
If you have imported graphic templates through the Import Graphics section of the Web Editor administrator settings, this disables the selected template in this project. If you have created a graphic template directly through the Web Editor, the act of disabling the template is equivalent to deleting the template. This action is irreversible. |
|
|
Delete |
Permanently deletes the template from the Web Editor. |
|
|
Edit |
(Captions only) Loads the selected template into the Source monitor for editing. |


To create a new graphic or graphic template through the panel:
-
Load a sequence into the Web Editor app.
The Graphics panel does not allow you to create a new graphic without first loading a sequence that includes at least one video asset.
-
Move the position indicator bar on the Sequence Timeline to the point at which you want to add the graphic.
-
Select the Graphics button from the Editor Sidebar and select the Graphics tab.
-
 Click the New button at the top of the panel to add a new graphic.
The Graphics Designer appears in the Source monitor and the graphic is added to the sequence.
-
Customize the graphic.
For more information on the Graphic Designer controls, see Adding Titles and Graphics.
-
(optional) Click the ellipsis button in the template designer and select Save As to save your graphic as a template.
To create a new closed captioning template:
-
Load a sequence into the Web Editor app.
The Graphics panel does not allow you to create a new template without first loading a sequence that includes at least one video asset.
-
Select the Graphics button from the Editor Sidebar and select the Captions tab.
-
Click the New button at the top of the panel to create a new template.
The Graphics Designer appears in the Source monitor. However unlike the process for creating a new graphic, this action does not add anything to the Sequence Timeline. In the case of a new Captions template, the app pre-loads the designer with a Captions text layer and a Background rectangle layer that are pined to each other by default.
-
Customize the template.
For more information on the Graphic Designer controls, see Adding Titles and Graphics.
-
Click the ellipsis button in the template designer and select Save As to save your template.
To add an existing template to your sequence:
-
Load a sequence into the Web Editor
-
(Graphics templates only) Move the position indicator bar to the point at which you want to add the graphic.
-
Select the Graphics button from the Editor Sidebar.
-
Do any of the following:
-
Double-click an existing template to add it to the timeline.
-
Select the template and click the Add to Timeline button below the Graphics and Captions area of the Editor Sidebar.
-
-
(if necessary) Customize the graphic.
For more information on the Graphic Designer controls, see Adding Titles and Graphics.
Using the Editor Sidebar's Transcripts Panel
 The Editor app allows you to create timecode-marked transcripts of the asset that is loaded into the Source monitor. Transcripts can help you edit to the voice-overs included in that asset, and they provide the basis for any closed captioning effect that you might want to add to your sequence.
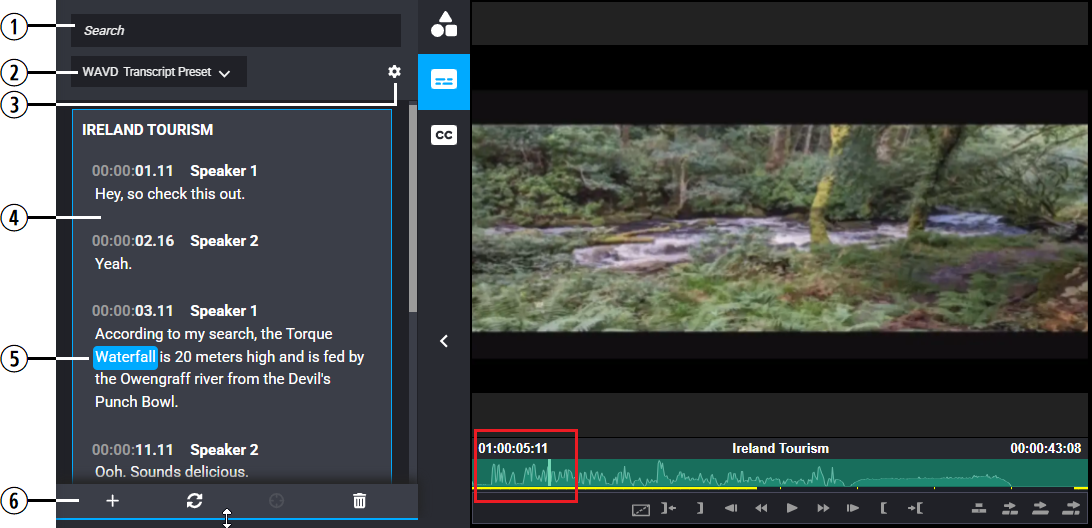
The following illustration and table describe the different areas of the Transcript panel.
|
# |
Section |
Description |
|---|---|---|
|
1 |
Search |
You can use the search bar to find text within the transcript. If the search finds one or more matches for your text, those sections of the transcript are highlighted in blue. |
|
2 |
Transcript Preset Menu |
Allows you to apply a settings preset to this transcript. If you have not created any presets, this menu is not displayed. For more information, see Configuring the Transcript Settings. |
|
3 |
Transcript Settings |
Allows to you configure how the transcript is displayed and treated within the Transcript Body area. For more information, see Configuring the Transcript Settings. |
|
4 |
Transcript Body |
After you create a transcript, the text is displayed here. Transcripts are broken down into timecoded segments marked by HH:MM:SS:FF (hours : minutes : seconds : frames). The breaks are determined by the options selected in the Transcript Settings. If you leave the Transcripts panel open and then play your source asset, the panel highlights each word as it is spoken. If all of your transcript text does not fit on-screen, the panel scrolls to reveal additional text as you play. If you transcribe the same asset into multiple languages, each language appears as a separate tab in the panel. If you transcribe the asset into more languages than can fit on-screen, the panel displays the currently selected language on the left and an alternate language selection menu on the right.
|
|
5 |
Selected Text |
You can click on any word in the transcript to have the position bar advance to that point in the Source monitor. In the example above, the word "Waterfall" is uttered at the 00:05:11 mark. Alternatively, you can highlight a section of text in the transcript. This action adds In and Out marks to the Source monitor for the selected area of your transcript. If you move the position indicator in the Source monitor, the transcript advances to that section (without highlighting any text). |
|
6 |
Additional Functions |
If you click anywhere inside the transcript, the following buttons appear at the bottom of the panel:
|

Creating a New Transcript
Transcripts remain connected to the source asset, even after you close your Avid Content Core user session.
This process describes how to create a new transcript from a source asset. You can repeat the process below to create additional transcripts in other languages. Each new transcript is connected to the same source asset.
c If you want to use the transcript and closed captioning features, contact your Avid representative to request the enablement of these features.
To create a transcript:
-
Load an asset into the Source monitor.
-
Select the Transcripts button in the Editor Sidebar.
-
Click the Create Transcript button.
The app displays a new window with additional options.
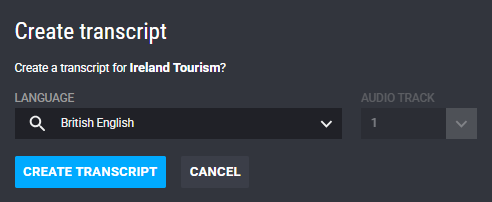
n For more information on the Upload Caption option that appears to the right of the Create Transcript button, see Uploading Caption Files.
-
Select an option from the Language menu.
You must select the language that is spoken in the source asset. For example, if the subject is speaking French, and you select German from the menu, the transcription process will fail.
Some language models include languages with multiple dialect variants. For example, the Editor app's default language model includes options for American English, Australian English, and British English. Select the language that is most suitable for you or your region.
Additionally, if you have an asset in which two people are speaking two different languages, the transcript will include information for only the language that you selected from the menu. If you need to have a transcript for both speakers, you can click the Add Transcript button to re-transcribe the asset for that alternate language.
n The language selection menu is also an editable text field. You can search for an alternate language by deleting the name of the displayed language and typing the name of a different language.
-
If your asset includes more then one audio track, you can select the specific audio track to be transcribed.
-
Click the Create Transcript button to start the asset analysis process.
When complete, the Transcript Body area displays the transcribed text.
Configuring the Transcript Settings
After you create a transcript, you can configure how the transcript is displayed and treated within the Transcript Body area. These settings can make the transcript easier to read, improve timing accuracy, and help set the pacing of your edit. As you adjust these settings, the Transcript Body updates automatically.
The following table described these options.
|
Name |
Description |
|---|---|
|
Max Duration |
Sets the maximum duration of a segment (in seconds). This setting defaults to enabled with an original default value of 60. |
|
Max Silence |
Sets the maximum amount of silence allowed between segment breaks (in seconds). If for example you keep the default value of 5 and there is a 10 second break in the audio, a new segment is created when the voices are picked back up. The duration of silence is longer than 5 seconds. If you have the same 10 second break and you set this to a value of 20, all audio might appear in the same segment (also depending on how you configure additional settings). This setting defaults to enabled with an original default value of 5. |
|
Max Words |
The transcript is broken into segments with this maximum number of words per segment. In the following example illustration, the Max Words count is set to 20 (left) and then it is adjusted to a value of 4 (right).
This setting defaults to enabled with an original default value of 1000. |
|
Max Characters per Second |
The transcript is broken into segments with this maximum number of characters per segment. If a single word is longer than the defined value, the entire word appears in the segment. For example if you set this setting to a value of 4 and a speaker says the word "please", that word remains whole. The app does not create a new segment after "plea". This setting defaults to enabled with an original default value of 1000. |
|
Max Characters per Line |
Defines the maximum number of allowed characters per line (including spaces and punctuation). The following example illustration sets this value at 50 (left) and then again to 20 (right). In this case the line has more than 20 characters, so the last word is wrapped to the next line.
This setting defaults to enabled with an original default value of 1000. |
|
Max Lines |
Defines the maximum number of lines allowed before the next break. This setting defaults to enabled with an original default value of 100. |
|
Punctuation |
If enabled, breaks the transcript into individual sentences. This setting defaults to disabled. |
|
Speakers |
Breaks the transcript into a new segment when a new speaker is detected. The speaker's name (Speaker 1, Speaker 2, etc) is appended to the right of each break. This setting defaults to enabled. If you disable this setting, the Speaker Preview option is removed from the settings. |
|
Speaker Preview |
Colorizes each speaker in the transcript. This setting defaults to enabled. |
|
Save As |
Allows you to save your settings as a template for future use. |
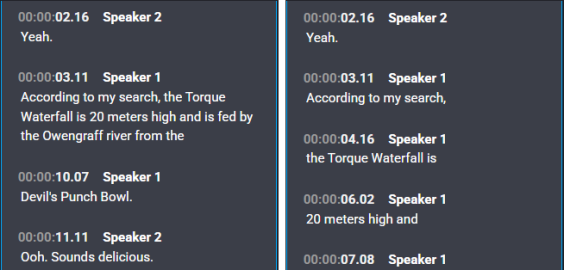

Do any of the following to edit your settings:
-
Click inside a field and type a new value.
-
Click inside a field and move your mouse left or right to increase or decrease the value.
-
Select or deselect the check box to the left of the value to enable or disable it.
Saving Your Settings
After you configure your settings, you can save them as a preset for future use. If you have at least one preset, a menu appears in the Transcripts Panel.
To create or update a preset:
-
Select the Transcripts button in the Editor Sidebar.
-
 Click the Transcript Settings button.
 -
(if applicable) If you have created at least one preset, you can select your current preset from the menu, or select the custom option to create and save a new preset.
-
Adjust your settings accordingly.
-
Do one of the following:
-
If you are creating a new preset, click the Save As button, enter your preset name, and then click Save.
-
If you are updating an existing preset, click the Save button.
-
Using the Editor Sidebar's Closed Captioning Panel
 The Closed Captioning panel has a similar look and controls as the Transcripts panel. The primary difference is the Body area of the panel. The Closed Captioning panel lists every segment that has been edited into the sequence, in order of their placement in the sequence. If your sequence includes any assets that are not associated with a Closed Captioning track, they appear in the panel as an empty tile with a Create Transcript button available.
Similar to the Transcripts panel, you can select a word in the transcript and the position indicator bar navigates to that point in the Sequence Timeline. If you highlight a section of the transcript, In and Out marks are added to the Sequence Timeline.
Adjusting the Caption Settings
The Closed Captioning panel allows you to customize settings related to the caption text. These settings are similar to those that you can use to customize the transcript. For details on these settings, see Configuring the Transcript Settings.
The Caption settings panel offers three additional features.
|
Name |
Description |
|---|---|
|
Fill Gaps |
Keeps each caption on screen until the next one starts, up to the number of seconds you set. When enabled, a short pause maintains the previous caption on screen, while a long silence still clears after a few seconds. |
|
Keep Speaker Gaps |
Only hold between captions from the same speaker, so there's still a clean break when someone else starts talking. |
|
Speaker Styles |
These settings allow you to define how the closed captioning text appears on-screen. You can create individual styles for each speaker. |
Adding Captions to the Sequence Timeline
After you create a transcript from a source asset, you can add the transcript to the Sequence Timeline as a closed captioning effect. The caption text is displayed above the matching source asset. You cannot add closed captioning text that originates from one asset and edit it over a different asset.
The following illustration shows that a transcript has been created for the "Transcript_and_Captions" asset, and that asset has been edited into the sequence. The purple effect above the Main track shows the closed captioning track. You might also notice that there are areas of the caption track that do not include any text. These breaks are natural points in the asset where the subject was not speaking.

The following illustration shows the same clip has been edited into two different areas of the sequence. The gap in captions could indicate that either the "Clip_Inspector" asset does not include a transcript, or that the editor has opted not to include those captions in the sequence.

In a third and final example, the following illustration shows two overlapping assets, each associated with a caption track.
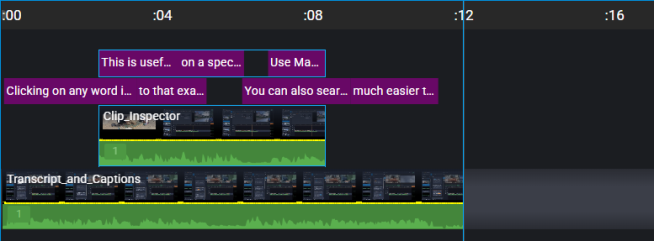
If you use trim mode to alter the duration of any asset that includes a closed captioning track, the CC effect is automatically adjusted to match the change made by the trim.
To add a transcript to the timeline:
-
Load a sequence into the Sequence Timeline.
-
Edit an asset that is associated with a transcript into the sequence.
You cannot add closed captioning information to the sequence if the source asset has not already been transcribed.
-
Select the Closed Captioning button in the Editor Sidebar.
-
(optional) Adjust the closed captioning settings.
-
Click the Add to Timeline button.
The panel displays a profiles menu.
-
Select a Closed Captioning template from this menu.
The captions are added to the sequence as an effect layer above the source asset.
-
(if applicable) Repeat the process to include additional captions.
n If you cut the same asset into the sequence multiple times, each segment is associated with its own card in the Closed Captioning panel.
Uploading Caption Files
If you already have a caption file for a source asset, the Web Editor allows you to import that file so that you do not need to re-transcript the asset.
To upload a source caption file:
-
Select either the Transcripts button or the Closed Captioning button in the Editor Sidebar.
-
Click the context menu button to the right of the Create Transcript button and select Upload Caption.
-
Click the Choose File button and navigate to the captions file that is associated with the asset.
-
Click the Open button.
-
Select your Language and (if applicable) audio track options.
-
Click Upload to import the captions file to Avid Content Core.
Editing the Captions Layer
After you add a captions track to your sequence, you can edit the layer to associate it with a different template, edit the speaker names, edit the text, and more. The following illustration shows the Edit Captions interface that appears in the Source monitor after selecting a captions layer.
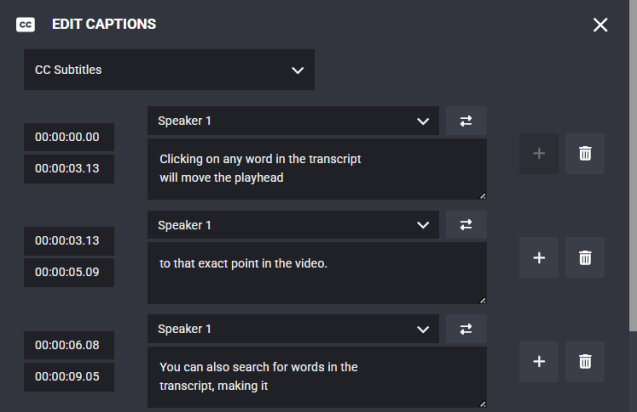
This interface allows you to correct any text that might have been analyzed incorrectly. You can also move text between breaks to better accommodate the timing of your edit.
The Add button to the right of each caption block allows you to insert a new caption block either before or after an existing caption. You can also click the Delete button to remove a caption block.
To access the captions editor:
-
Double-click any captions layer in your sequence to load the closed captioning data into the editor.
The Edit Captions controls appear in the Source monitor.
Configuring the User Settings
The Web Editor User Settings allow you to configure the Web Editor keyboard shortcuts to match those of multiple popular non-linear editing applications, such as Media Composer. Alternatively, you can create a custom keyboard profile of your own.
The following illustration and table describe this area of the app.
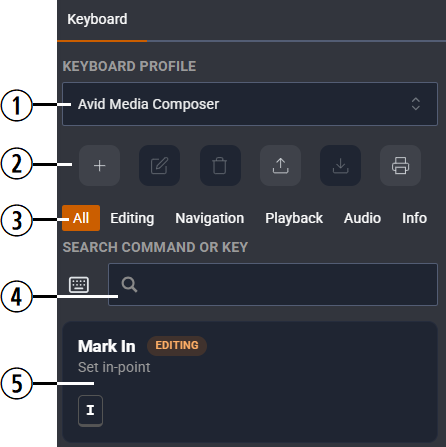
|
# |
Section |
Description |
|---|---|---|
|
1 |
Profile Selection Menu |
Use this menu to select a default system or custom profile. |
|
2 |
Controls |
Listed from left-to-right:
|
|
3 |
Button Categories |
You can click any of the tabs in this section to sort the list of commands by that category of features. |
|
4 |
Search |
You can enter text here to search for the name of a function or a word that might appear in the description of that function. For example, the word "step" not only returns hits for Step Forward and Step Back, but also replies with information on related JKL functionality. |
|
5 |
Function list |
Displays a list of functions and their shortcuts, based on the selected profile and button category. |
Creating a New Profile
You can create one or more custom profiles to customize the keyboard shortcuts to meet your needs.
To create a new profile:
-
Click the Add New Profile button.
The Create New Profile window appears.
-
Type a name for this profile.
-
Select one of the system profiles from the menu.
Your selected profile acts as the basis for your new custom profile.
-
(optional) Enable the Make Available for All Users check box to allow other ACC users to see this profile.
Shared keyboard profiles cannot be altered by other users. However similar to the process of selecting a system profile, another user can use your profile as the basis to create a different set of settings.
-
Click the Create button to save the profile.
The profile appears in the menu under the My Profiles section.
-
Customize your profile by doing one of the following:
-
Click the existing key or function button to edit the function.
-
 Click the Add Shortcut button to the right of the function to add a new shortcut to this same function.
For example, the Mark In function defaults to the "I" key. The following illustration shows that the user added Shift+\ to invoke that same function.
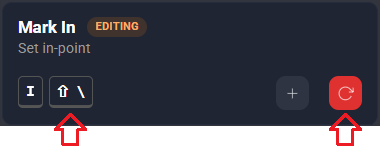
After customizing a function, you can click the Reset to Default to revert the function to its original settings.
-
-
Click inside the text box and enter your keyboard command or combination.
For example, the Shift key appears as an Up arrow in this text field.
n If you enter a key or key combination that is already in use, the editor warns you about the conflict.
-
(optional) Click the Use Key Value button.
-
Do one of the following:
-
Click Remove to disassociate this function with a keyboard command.
-
Click Save to save your changes to this function in your custom profile.
-
Click Cancel to abort changes to this function.
-