Using the Source and Record Monitors
The Source and Record monitors provide the same frame-accurate playback controls as the Player Monitor. However each monitor includes a row of buttons that are both specific to the Editor app, and specific to their function (source or record).
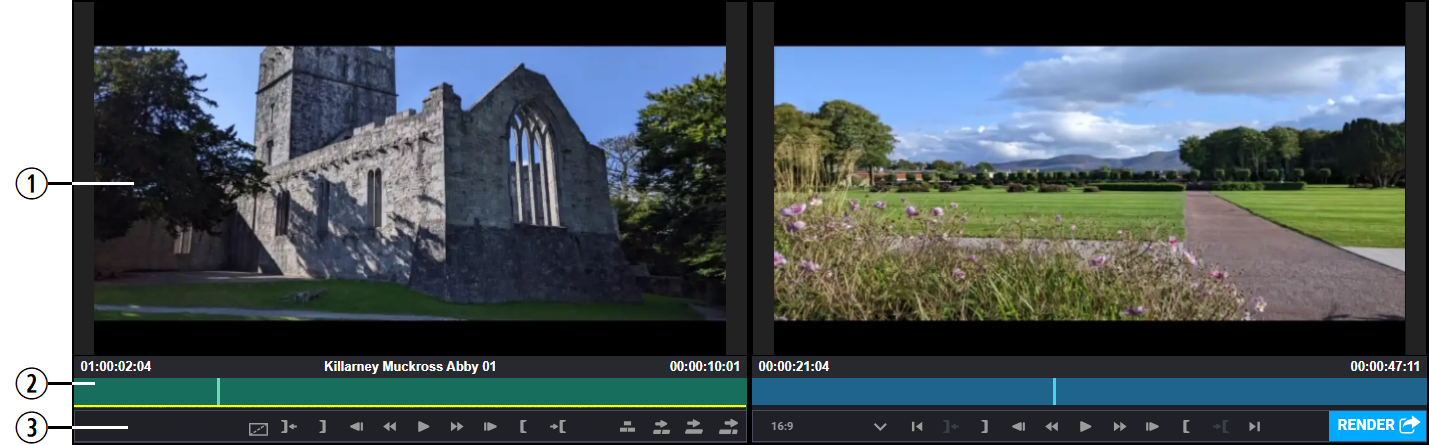
Each monitor is divided into three general areas:
-
The media viewer
-
The position indicator panel
-
Playback and edit controls
Source / Record Monitor Controls
The following tables provide more information about the rows of buttons available under each monitor.
Common Functionality
The following buttons are available under both the Source and Record monitors.
|
Icon |
Name |
Description |
|---|---|---|
|
|
Go to In |
Moves the position indicator to the In point. If you are working in the Source monitor and you do not set a custom In point, the position indicator bar moves to the first frame of the asset. |
|
|
Mark In |
Adds a point that defines the beginning of a segment. If you use a keyboard modifier key, this button can also remove a Mark In point. |
|
|
1 Frame Back |
Moves the position indicator bar one frame back. |
|
|
Rewind |
Plays the asset in reverse at various shuttle speed increments. Equivalent to the use of the J key. For additional information, see Using Preview Aspect Ratio. |
|
|
Play / Pause |
Click to play the media; click again to pause the media. |
|
|
Fast Forward |
Plays the asset forward at various shuttle speed increments. Equivalent to the use of the L key. For additional information, see Using Preview Aspect Ratio. |
|
|
1 Frame Forward |
Moves the position indicator bar one frame forward. |
|
|
Mark Out |
Adds a point that defines the end of a segment. If you use a keyboard modifier key, this button can also remove a Mark Out point. |
|
|
Go to Out |
Moves the position indicator to the Out point. If you are working in the Source monitor and you do not set a custom Out point, the position indicator bar moves to the last frame of the asset. |


Source Monitor Only
The following buttons apply to functionality that is available in the Source monitor only. For more information on the editing functions, see Editing a Sequence.
|
Icon |
Name |
Description |
|---|---|---|
|
|
Create Filler |
Creates a mock asset of black filler video with no audio track that can be edited into your sequence. Alternatively, you can press Y on your keyboard to add 10 seconds of filler to the Main track at the current location of the position indicator bar. |
|
|
Connect Video On Top |
Using the position indicator as your in point, edits the asset onto a new track. |
|
|
Insert |
Using the position indicator as your in point, complete an insert edit onto the main track. |
|
|
Overwrite |
Using the position indicator as your in point, complete an overwrite edit onto the main track. |
|
|
Append |
Edits the source asset to the end of the final segment of the Main track. |


Record Monitor Only
The following buttons apply to functionality that is available in the Record monitor only.
|
Icon |
Name |
Description |
|---|---|---|
|
|
Preview Aspect Ratio |
Allows you to preview what your sequence looks like in various output formats by adding virtual bars to the monitor. You can also use this tool to keyframe the focus of your video. For more information, see Using Preview Aspect Ratio. |
|
|
Go to Start |
Moves the position indicator bar to the first frame in the sequence. |
|
|
Go to End |
Moves the position indicator bar to the last frame in the sequence. |
|
|
Render |
Creates a rendered output of your sequence for all of the output formats that are configured on your system by your administrator. The ability to publish assets to social media destinations is restricted by administrator defined user roles. If your user account is not associated with this role, you will not see the Render button. If the Render button turns red, it indicates that some of the media in your sequence is offline. For more information, see Publishing Sequences. |




Loading Assets into the Source Monitor
The Source monitor allows you to view assets and add Mark In and Out points for clips that you want to cut into your sequence. You can load source assets, such as Production Management master clips into the Source monitor only.
The Web Editor app does not allow sequences created through the app to be loaded into the Source monitor.
Whenever you load an asset into the Web Editor Source monitor, the asset is also loaded into the Player. You can use the Tabs section of the Player to obtain more information about that asset. While using the Web Editor, the Player does not show the Player Monitor. For more details on the Player, see Using the Player Monitor and Tabs.
Do any of the following to load an asset into the Source monitor:
-
Double-click an asset in the Project Bin.
-
Drag and drop an asset from the Project Bin into the Source monitor.
-
Dock the Search app and open the Web Editor in the Main area of the ACC user interface. You can now drag and drop an asset from Search to the Web Editor to add it to the Project Bin and open it in the Source monitor.
-
Double-click the video track of any segment in the timeline to load that asset into the Source monitor.
In this case, the clip is loaded into the monitor with the Mark In and Out points set for that specific segment.
Using the Position Indicator Panel
Each of the position indicator panels below the source and record monitors provide similar functionality. Primarily, they show the location of the position indicator bar. The following illustration shows the position indicator bar at the 00:00:22:06 point on a source asset.

The panel displays the timecode for position indicator's current location on the left, and it shows the total length of the asset on the far right-side. The panel also displays the name of the asset in the area between these two timecode values.
If your source asset includes audio, then the panel also displays audio waveform levels. These levels can help you to make easier editing decisions by making it obvious as to where important audio segments might begin and end. The audio waveforms are not displayed in the record-side panel because the sequence timeline includes finer audio controls.
The bottom of the panel displays a yellow bar that shows the portions of the asset that have been downloaded to your local cache. The fragmented download process allows you to quickly view the portion of the asset that you need. This approach can be especially useful if you are working with larger assets, as you do not need to wait for the entire asset to be available prior to playback.
Moving the Position Indicator Bar
In addition to using the playback controls found under each monitor, you can navigate through assets using the position indicator bar.
To move to a different point in the asset:
-
Do any of the following:
-
Click anywhere in the position indicator panel to move to a different point in the asset.
-
Click and hold the mouse in the position indicator panel, and move left or right to scrub through the asset. After you found your desired location, release the mouse button.
-
If you are working in the sequence timeline, you can perform either of the above actions in the Sequence Timeline area to move the position indicator bar.
Movement in the Sequence Timeline is synchronized with movement in the Record monitor. If you use the controls under the Record monitor to change the position of the bar, the Sequence Timeline responds accordingly.
-
Changing the Timecode Display
The Web Editor allows you to change the Position Indicator Panel's timecode display by toggling between offset timecode and source timecode.
To change the timecode display:
-
Click the timecode box in the bottom-left corner of the Position Indicator Panel.
As you hover over the panel, the timecode turns blue as a visual reminder of this feature.
The offset timecode shows the location of the position indicator bar, as offset from 00:00:00:00. The source timecode displays the assets original timecode.
Using Preview Aspect Ratio
Previewing the Output
When you are publishing an asset to multiple endpoints, you might find it useful to see how your final output will look like on different screen sizes — such as a mobile phone. The Preview Aspect Ratio button allows you to see a virtual example of your final output. The following illustration shows the same asset in the original 16:9 mode (left), and again in 9:16 (right).
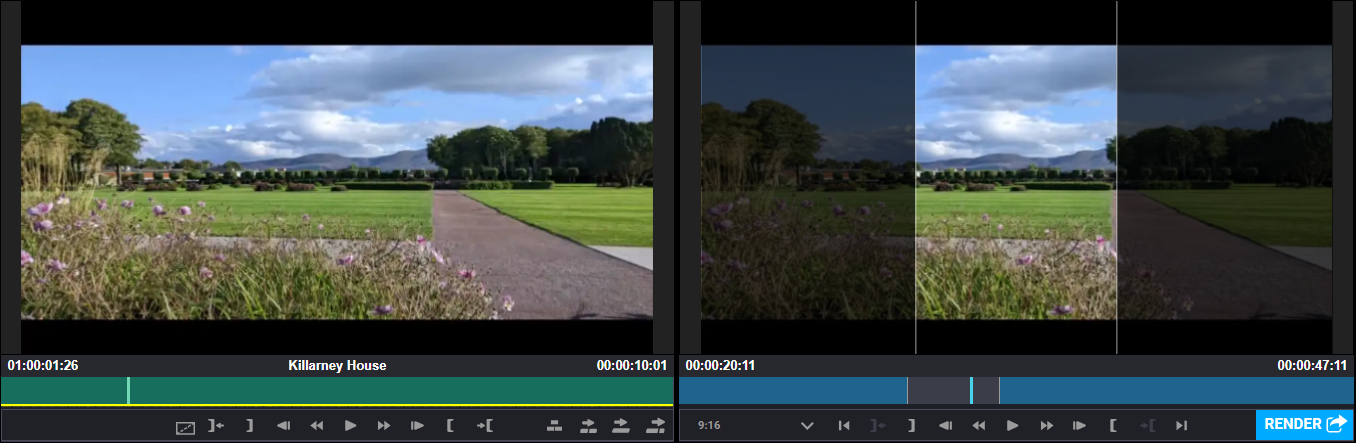
To display the virtual aspect ratio bars:
-
Load a sequence into the Record Monitor.
-
Click the Preview Aspect Ratio button and select an alternate output format.
The virtual bars appear in the Record Monitor.
-
You can remove the bars by clicking the Preview Aspect Ratio button again, and selecting your asset's original aspect ratio.
Editing for the Aspect Ratio
In addition to providing a simple preview, the app allows you to change the focus for each aspect ratio by keyframing the preview window. For example you might have a 16:9 output that includes the entire frame, but when switched to 9:16, the video's subject might be left or right of center. You can use this mode to track your subject as it moves out of center.
If you create a keyframe in an aspect ratio that is narrower than 16:9, the same keyframe is set for all other aspect ratios that are smaller than 16:9. Therefore the best practice recommendation is to keyframe your video using the smallest aspect ratio for your desired output formats.
For a related topic when working with graphics, see Using the Aspect Awareness Controls.
To edit the focus of your video:
-
Load a sequence into the Record Monitor.
-
Complete your edit in your primary aspect ratio (normally 16:9).
-
Click the Preview Aspect Ratio button and select an alternate output format.
The virtual bars appear in the Record Monitor.
-
Click and drag the image in your Record monitor to move the focus of the video to fit inside the aspect ratio preview window.
A keyframe appears in the Record monitor's position indicator panel. If you set only one keyframe, the focus is shifted to that point for the length of the sequence.
-
Continue to add keyframes as necessary to track your subject across the segment, or the length of the sequence.
The following illustration shows a sequence with four added keyframes.

n You can delete any keyframe by selecting it with your mouse, and then clicking the Delete key on your keyboard.