Working with Audio
This section describes the tools and methods for working with audio in the Editor app. The topic is divided into the following categories:
Understanding the Audio Meters
The audio meters to the right of the Sequence Timeline allow you to view the audio levels during playback. Defaulting to a range of -60 dB to 0 dB, you can click the meters to toggle between different decibel (dB) ranges. The following illustration shows the meters with active audio playback (left), and the different ways that you can change the representation of the meters.
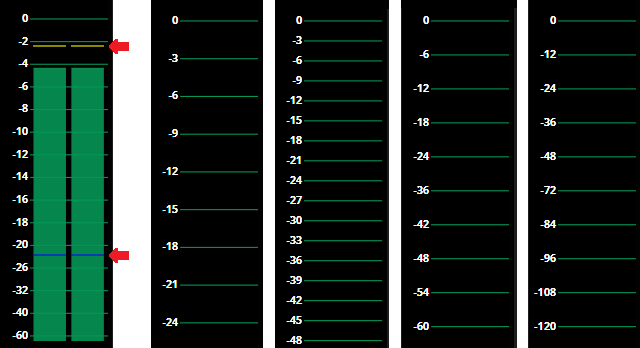
The audio meters also display dynamic peak (yellow line) and valley (blue line) indicators that can help you adjust your audio output levels.
To adjust the audio meters:
-
Load any sequence in the Sequence Timeline and click anywhere on the audio meters to cycle through the different views.
Audio Scrubbing
 Disabled by default, the Enable Audio Scrubbing feature allows you to listen to your audio as you drag the position indicator bar across the timeline.
This feature applies only to scrubbing the through the Sequence Timeline. If you use the position panel under the Record monitor, you do not hear the audio when scrubbing through the asset.
Expanding / Decreasing the Audio Track Size
 When editing an asset into the timeline, the Editor app shows the video and audio connected for each segment by default. However if you click the Expand All Audio Tracks button in the Sequence Timeline, the app reconfigures the timeline with an alternate view.
The following illustration shows a simple sequence with two assets. In this case the audio tracks are collapsed which makes each audio track appear connected to its associated video track.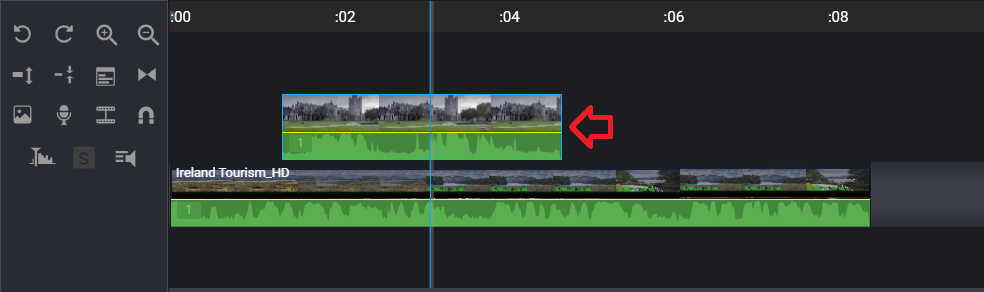
This alternate illustration shows the same sequence with the audio tracks expanded. The audio track for "V2" now falls below the Main track, allowing you to work with the audio in greater detail.
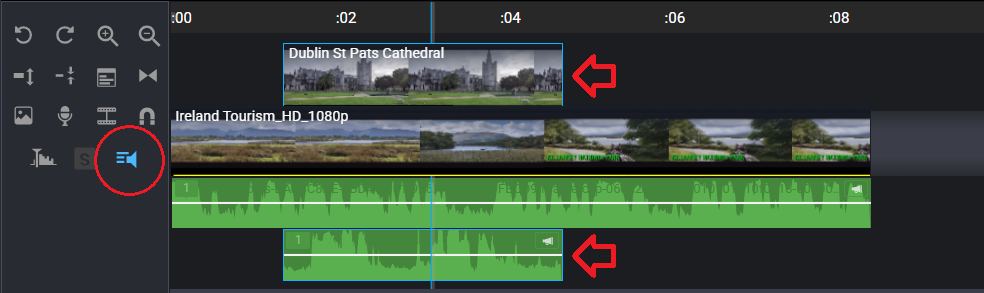
After expanding the tracks, you can use the same controls to disable the feature and collapse the tracks to their original size and position.
To expand or collapse all audio tracks:
-
Load a sequence in the Editor app.
-
Do one of the following:
-
Click the Expand / Collapse All Audio Tracks button in the Timeline Toolbar Controls.
-
With focus on either the Record monitor or the Sequence Timeline, press Shift+Z on the keyboard.
-
To expand or collapse the audio of an individual segment:
-
Load a sequence in the Editor app.
-
Do one of the following:
-
Double-click the audio track of an individual segment.
-
Select the segment in the timeline and press Z on the keyboard.
-
Working with Audio Segments
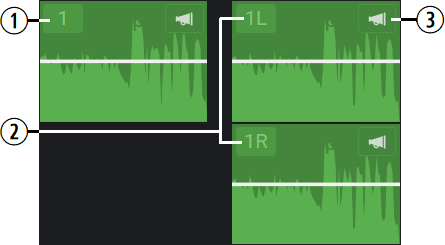
If your sequence includes an audio-only segment, the audio track includes controls that allow you to reconfigure how the track or channel is used in the sequence.
The following illustration and table describe the controls available on the audio tracks.
|
# |
Description |
|---|---|
|
1 |
Button / menu for a Stereo track |
|
2 |
Buttons / menus for a Mono, 2 channel pair (not shown) If you have an audio segment with additional channels, you might see more track indicator labels. For example a 5.1 audio track displays the following labels: 1L, 1R, 1C, 1SW, 1SL, and 1SR. |
|
3 |
Boost. If your segment has extremely low levels, you can click this button to increase the level of the selected asset by +18dB. After boosting, you can continue to adjust the levels of this segment if required. |
If you right-click the number in the upper-left corner of the track, the app displays a menu with the following options:
-
Solo — Soloing an audio segment or a channel of an audio segment mutes all other audio in the sequence (all tracks) that are not soloed. When you solo a segment or a channel, the number changes to an "S" and the segment turns yellow as a visual reminder of this action.
 After soloing, you can right-click the "S" and select Solo again to remove the status. Alternatively, you can un-solo all segments by clicking the Unsolo button in the Timeline Toolbar Controls.
n Soloing or muting a segments applies this status for playback within the app only; soloed and muted tracks are included in your final output.
-
Mute — Mutes the selected segment or channel.
After muting, you can right-click the "M" and select Mute again to remove the status.
-
Disable Others — If you are working on a track with multiple distinct channels, you can right-click the number and select Disable Others to disable all channels except for the one that you right-clicked.
Alternatively, you can click the number in the upper-left corner of the track to disable the track / channel.
Disabled audio segments are not included in your final output.
-
(Stereo tracks only) Split to mono — If you have a stereo segment, you can split the audio into mono channels.
-
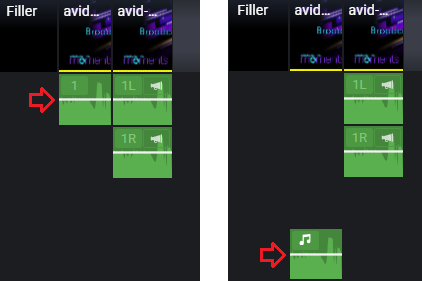
Detach audio track — This function breaks the connection between the video and the audio track, allowing you to edit either track independently from the other. For example after detaching, you can move the audio segment to a different position in the timeline.
The following illustration shows a before and after example of a detached segment. Note that after it is detached, the icon in the upper-left corner of the segment changes to a musical note to indicate that it is an audio-only segment.
The following illustration shows three example segments where the first is disabled, the second has a mono segment with the left channel soloed, and the third segment is muted.

Adjusting Volume Levels
When you expand the audio tracks in the Sequence Timeline, the Editor app provides additional controls that allow you to adjust the volume levels of your sequence. Volume level changes work on a segment level only. You cannot use these controls to globally adjust the audio levels for an entire multi-segment sequence.
When you adjust the levels on a segment, the changes are applied to the sequence only. Your original source assets remained unchanged.
Adjusting Levels for an Entire Segment
While you cannot use the expanded audio controls to adjust the levels for an entire sequence, you can adjust the levels for a segment.
If you drag the level down to the minimum possible value, you essentially mute the segment. This is represented on the timeline by the negative infinity symbol (-∞).
To adjust the audio levels for a segment:
-
Load a sequence in the Editor app.
-
Click the Expand All Audio Tracks button in the Timeline Toolbar Controls.
The audio tracks expand. A white line in each track identifies the current level for the asset.

-
(optional) Click the Increase / Decrease Track Height buttons to adjust the size of the tracks to your liking.
-
Click and drag the white line up or down to adjust the audio level and release the mouse when done. Alternatively, you can hold down the Alt key (Win) or Option key (Mac) while dragging to move with greater precision.
As you drag the bar, a tool-tip appears to display the new audio level.

After you release the mouse, you can hover your cursor over the white line to display the current level.
-
(optional) Play the adjusted segment and watch the audio meters to verify that your audio levels are in range with your desired output.
Keyframing your Audio
The Expanded audio controls also allow you to add keyframes to your audio, providing you with finer controls over audio peaks or valleys. In the following illustration, the editor has added two keyframes around a peak in the audio.

They then added two additional keyframes and dragged them down to reduce the levels of those peaks.

You can add as many keyframes to your segment or sequence as needed. The Editor app does not have a maximum number of allowed keyframes.
If you hover over the audio track, tool-tips appear to show you the levels for each individual keyframe.
To add a keyframe:
-
Load a sequence in the Editor app and click the Expand All Audio Tracks button in the Timeline Toolbar Controls.
-
Click anywhere along the white line to add a keyframe at that point.
-
Do either of the following:
-
Drag the keyframe up or down to change the audio levels for that keyframe.
-
Drag the keyframe horizontally along the timeline to move it to a new position.
n You cannot move a keyframe past another existing keyframe in the timeline.
-
To delete a keyframe:
-
Load a sequence in the Editor app and click the Expand All Audio Tracks button in the Timeline Toolbar Controls.
-
Click on the keyframe that you want to delete to remove it.
Recording a Voice-over
The Editor app allows you to record voice-over work directly to the sequence timeline.
If your browser or operating system does not allow access to your microphone, the app displays a message indicating that it is: "Unable to record voice-over. Microphone access blocked." If you see this message, contact your local desktop administrator for assistance.
To record a voice-over:
-
Load a sequence in the Editor app.
-
Move the position bar to the desired starting point on the timeline.
-
 Click the Record Voice-over button in the Timeline Toolbar Controls, or press R on your keyboard to start the process.
The button turns red and a countdown timer appears in the Record monitor.
n If you want to cancel the recording, you must quickly click the Record Voice-over button before the countdown reaches zero.
-
Wait for the countdown to reach 0, then start recording your voice-over.
When the timer reaches zero, the Source monitor and the Sequence Timeline areas darken and the microphone button in the Timeline Toolbar Controls turns red to indicate that you are recording.
-
When you are done, click the Record Voice-over button again, or press R to stop the recording.
 The voice-over appears below the other audio tracks on the timeline. The segment is identified with a microphone icon. The recording also appears in the Project Bin area of the Editor Sidebar. Voiceover recordings are saved to the current project only and are not returned through any Avid Content Core search.
To delete a voice-over:
-
Select the segment in your sequence timeline and press the Delete key on your keyboard.
This removes the voice-over from your sequence, but the asset remains available in your Project Bin.
-
 Select the asset in the Project Bin and click the Remove from Bin button.
This removes the voice-over from the Project Bin, but the asset remains available in the Sequence Timeline.