Creating Regular Tasks
You can create the following regular tasks:
-
Private tasks to organize your daily work.
-
Team tasks on which your team can collaborate on.
For information on how to create Review and Approval tasks, see Using Review and Approval Tasks.
Creating regular tasks is supported in the Tasks app and Search app and on the Landing page. Note the following differences regarding attachment handling:
-
When you create a regular task from the Tasks app, adding attachments is not required.
-
When you create a regular task from the Search app, you need to attach at least one asset to the task. If you do not select an asset in the Search result list, the Create Task controls are not shown.
-
When you create a regular task from the Landing page, the asset on which you open the context menu is automatically attached to the task.
The following values are preset and cannot be changed while creating a regular task:
-
Type: Regular
-
State: Not started
Complete the following process to create and save a regular task.
To create a regular task in the Tasks app:
-
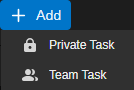
Click the Add button and select the access type of the task to be created:
-
Private Task
-
Team Task
The Task Details panel opens on the right side of the Tasks app.
-
-
Enter a name for the task in the Name field.
If you do not provide a name, "New Task" is inserted when you click outside the Name field.
-
(Shown only for a Team task, optional) Click on the Assignee control and assign the task to a user. For more information, see Assigning a Task to Another User.
-
(optional) Enter a Start Date and time to define the start date for the task.
-
Click the date field and either select a date from the calendar display, or use your keyboard to enter a new value.
-
Click the time field and use your keyboard to enter a new value.
For more information, see Working with Date Fields.
-
-
(optional) Enter a Due Date and time to define the completion date for the task.
-
(optional) Click the Priority menu and assign a new priority. By default, Medium is selected. See Changing the Task Priority (List View).
-
(optional) Add tags to the task: Click on the Add (+) button in the Tags area of the task, enter a tag name in the text field and press Enter. See Using Tags.
-
(optional) Enter text in the Notes field to provide more information about the task. See Using Notes.
-
(optional) Add attachments to the task. See Using Attachments.
-
Do one of the following:
-
Click the Add button to save your task.
Once the Tasks area is refreshed (automatically or manually), your new task is shown and is selected.
n If the new task is not shown, check if filters are applied to the tasks list that prevent new tasks from being shown.
-
Click the Cancel button to exit the task without saving. This also closes the Details panel.
-
-
Do one of the following:
-
Click the Add button on the toolbar and create an additional task.
-
Click the Hide Task Details button to close the Details panel.
-
To create a regular task from the Search app:
-
Open the Search app and conduct a search for assets you want to attach to a task.
-
Select the asset(s) that are to be attached to the task in the Result list. You can add a maximum of 20 attachments to a task.
-
Do one of the following:
-
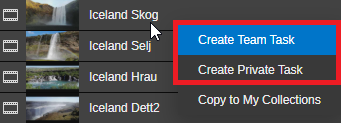
Right-click the selection and select the access type of the task to be created from the context menu: Create Public Task or Create Team Task.
-
Click the App Menu button and select Create Team Task or Create Private Task.
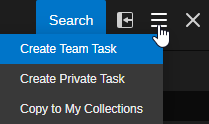
A task creation window opens. The selected assets are attached to the task.
-
-
Enter a name for the task in the Name field.
If you do not provide a name, "New Team Task" or "New Task" is inserted when you click outside the Name field.
-
Fill out fields as needed.
-
Click the Add button.
The task creation window is closed and the task is saved. The Search app remains open.
To create a regular task from the Landing page:
-
Open the Landing page.
-
Locate the asset to be attached to a task in one of the Exploration panels (Trending, Recently Added or Recently Modified) or in My Collections (panel or app).
-
Right-click the asset and select the access type of the task to be created from the context menu: Create Public Task or Create Team Task.
A task creation window opens. The selected asset is attached to the task.
-
Enter a name for the task in the Name field.
If you do not provide a name, "New Team Task" or "New Task" is inserted when you click outside the Name field.
-
Fill out fields as needed.
-
Click the Add button.
The task creation window is closed and the task is saved. The Landing page remains open.
Messages Shown When Saving a Task
Saving a new task is not covered with an additional message during normal operation. Only for specific cases you might see a dialog box before the task is saved.
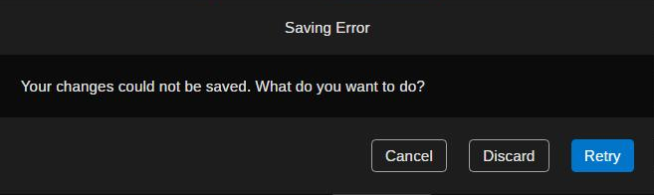
Saving Error
If your new task cannot be saved, a Saving Error dialog box opens. Do one of the following:
-
Click Cancel to close the Saving Error dialog box. The unsaved task is still shown in the Details panel.
-
Click Discard to close the Saving Error dialog box and exit the task without saving. This also closes the Details panel.
-
Click Retry. A save request is again sent to the backend. If the task can be saved, the Saving Error dialog box is closed. If saving again fails, the Saving Error dialog box remains open.
Unsaved New Task
When you select another task in the Tasks area before saving the new task, an Unsaved new task dialog box opens.
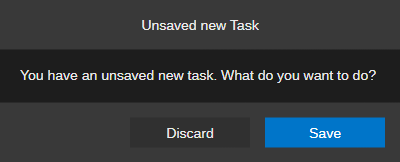
Do one of the following:
-
Click Discard to cancel the unsaved task.
-
Click Save to save the new task.
After that, the details of the task selected in the Tasks area are shown in the Details panel.