Using Review and Approval Tasks
In addition to the Review and Approval app, you can use the Details view of a Review and Approval task to run the Approval step in the Tasks app. For more information on the review and approval workflow in the Review and Approval app, see Using the Review and Approval App.
The displayed stage, available stage transitions and state of the Review and Approval task are related to each other and are updated during the processing flow. Example: For a Review and Approval task with stage "Approved" or "Canceled", the state is set to "Completed" and no other stage can be applied; for a task with stage "Rejected", the state is "In Progress" and the stages "Request" and "Cancel" can be applied.
|
Task Stage |
Available in Stage control |
Task State |
|||
|---|---|---|---|---|---|
|
Request |
Approve |
Reject |
Cancel |
||
|
Requested |
- |
X |
X |
X |
Not started In progress |
|
Rejected |
X |
- |
- |
X |
In progress |
|
Approved |
- |
- |
- |
- |
Completed |
|
Canceled |
- |
- |
- |
- |
Completed |
Note that changing the stage is controlled by permissions/roles:
-
Viewer: Can create a Review and Approval task but cannot change the stage.
-
Editor and Journalist: Can Request and Cancel a Review and Approval task.
-
Approver: Can Request, Reject, Approve and Cancel a Review and Approval task.
Note the following:
-
Tasks for which the stage cannot be changed show only the colored stage icon.

-
Tasks that allow changing the stage show the drop-down arrow to the right side of the colored stage icon that opens the stage transition menu.

-
If a Review and Approval task is rejected, the task is automatically re-assigned to the user that created the task.
To change the stage:
-
Open the Details panel of the task in the Tasks app.
-
Click on the stage icon or the drop-down arrow.
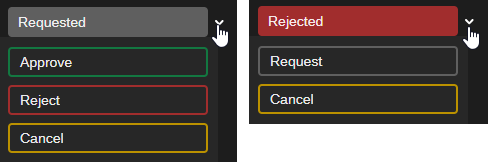
The following illustrations show the options for a Requested task (left) and a Rejected task (right).
-
Select the stage you want to assign to the task.
To create a Review and Approval task:
-
Right-click an asset (sequence or masterclip) in the Search app and select Request a Review from the context menu.
A Review and Approval task creation window opens; the asset is attached and the following default values are shown:
-
State is Not started (cannot be changed before the task is saved).
-
Name shows: Review for <name of the asset> for which the review is requested.
-
No Assignee is selected.
-
Start Date and Due Date are not set.
-
Priority is Medium.
-
Stage is Requested (cannot be changed before the task is saved).
-
-
Click on the Assignee control and assign the task to a user.
The Assignee is generally the person expected to complete the review. You cannot assign a single Review and Approval task to more than one user at a time.
-
(optional) Fill out other fields as needed.
-
Click the Add button.
The task creation window is closed and the Review and Approval task is saved. A notification is sent to the Assignee of the task. The Search app remains open.
-
(optional) Open the Tasks app and do one of the following:
-
Change the State or Stage or both, as needed, and close the task details.
-
Double-click the task or right-click on the task and select Open in Review and Approval App from the context menu to open the task in the Review and Approval app.
-
To open a Review and Approval task in the Review and Approval app:
-
Double-click the task in the Tasks list.
-
Right-click the task in the Tasks list and select Open in Review and Approval app from the context menu.
-
Click on a Review and Approval notification.
The task is opened in the Review and Approval app.
If, for any reason, the task does not have an attached asset, the Review and Approval app shows the message "The task has no asset attached, so review and approval is not possible".
To open a Review and Approval task from the Review and Approval app:
-
In the Review and Approval app, click the App Menu and select Switch to Tasks app.
The Tasks app opens, the task is selected in the Tasks list and its details are shown in the Details panel.