Editing a Sequence
A sequence is an arrangement of assets on the timeline that includes audio and video clips, information about edit decisions, applied graphics and effects, and more. It is the representation of your final output. The Web Editor app allows you to build sequences with media from any Production Management or MediaCentral Asset Management system that is connected to Avid Content Core.
Whenever your on-prem MediaCentral Cloud UX system is alerted to a new Production Management asset, it creates a high-quality 1080p proxy of that asset and uploads the media to Avid Content Core cloud storage. When you edit, you are editing with this proxy media.
In the case of Asset Management video assets, a similar process is initiated. However in this case, the proxy media is created by the Asset Management system itself. Be aware that native Asset Management proxies might not be of the same quality as the Production Management proxy media. Organizations must decide if the Asset Management media is of high enough quality to use in your final output. Differences in quality might be particularly obvious when editing media from the two different sources into the same sequence.
The Web Editor app allows you to combine any number of assets from any connected system with no concerns about compatibility. You can combine NTSC, PAL, SD, HD, XDCAM, AVC, 30i, 1080p, 720p, and other asset formats and frame rates in the same sequence.
Editor app sequences have a default maximum length of 90 minutes and do not have a maximum number of allowed audio or video tracks.
Automatic Sequence Saving
Whenever you make a change to your sequence, that change is saved automatically and nearly instantaneously on the server. This automation makes it very difficult to lose any work in Avid Content Core, even if your browser or workstation crashes.
The Editor app also includes an unlimited undo stack. For example, you could make 500 changes to your sequence, and then undo all 500 of those edits if desired. The undo stack is saved in the cloud, per sequence, and it is a resource that is shared with anyone that is editing the sequence. That means that if you are working collaboratively with another user and you undo an action, it is possible to undo the action of the other user. You cannot browse the undo history and selectively undo an action. All undos happen linearly, reverting the most recent action first.
This section includes the following topics:
Editing Assets into the Sequence Timeline
After you load a sequence into the Record monitor, you can add clips to the timeline to start building your sequence. The Editor app allows you to complete this task using multiple common editing methods such as insert (splice-in) and overwrite.
When you add your first clip to the sequence, you can perform an insert or overwrite edit. As there are no other assets in the sequence, the method that you use for this first edit is somewhat unimportant. However, the way that you perform subsequent edits has a large impact on the look of your sequence.
An insert or splice-in edit allows you to add a clip before an asset, after an asset, or in the middle of an asset — on the main track. When you complete the edit, the new asset is inserted at the location of the position indicator bar. Any assets following this point are pushed to the right on the main track.
An overwrite edit works somewhat differently. In this case the edit replaces a portion of a sequence with a new asset on the main track.
You can use the Editor app to create video-only, audio-only, or audio / video sequences with any combination of allowed effects. If you plan to send a video-only or audio-only sequence to a publishing endpoint, check your workflow to ensure that the endpoint supports that sequence type. For example, some social media platforms might demand that an asset has both audio and video.
To edit an asset into the sequence using the Source / Record monitors:
-
Load an asset into the Source monitor.
For additional information, see Loading Assets into the Source Monitor.
-
(optional) Use the controls under the Source monitor to add Mark In and Mark Out points.
For additional options, see Three Point Editing.
-
(if necessary) Move the position indicator bar in the Record monitor, or the Sequence Timeline to the point at which you want to add the new asset. This step is required for Connect, Insert, and Overwrite edits.
-
(if applicable) Hover your cursor over the Source monitor to display the audio controls, and decide on your audio options.
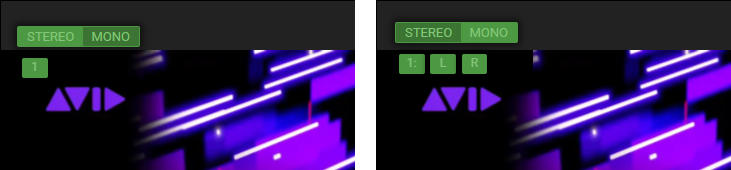
On hover, the audio controls appear in the upper-right corner of the monitor. In this example illustration, the asset has a single audio track. This is identified by the number 1 shown below the Stereo button. The image on the left shows the stereo track options, and the image on the right shows the interface after clicking the Mono button.
Do any of the following:
-
Click the Stereo button to edit the clip into the timeline as a stereo pair.
-
Click the Mono button to edit specific channels into the sequence.
In this example, you can click the number to disable the channels associated with that track, or you can click the L or R buttons to enable / disable only the left or right track.
-
Deselect the numbered track(s) to make a video-only edit into the sequence.
If you deselect the audio, the segment appears in the sequence with a green bar below the video (suggesting the presence of an audio track), but if you are viewing the sequence in the Expanded audio mode, you will see that no audio track is present.
n If your asset includes a video track, you cannot make an audio-only edit. If you want to use your source asset's audio only, configure your audio options and edit the clip into the sequence. After the edit, you can detach the audio from the video and then delete the video track. For additional details, see Working with Audio Segments.
The following example illustration shows how the same asset can be edited into the sequence.
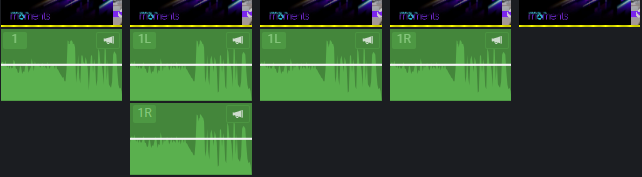
As shown from left to right: stereo pair, mono with both channels enabled, mono left only, mono right only, video only (no audio).
As long as you edit at least one audio track into your sequence, you can alter the audio options after the segment is cut into the timeline. For details, see Working with Audio Segments.
-
-
With the Source monitor, Record monitor, or Sequence Timeline in focus, do one of the following to make your edit:
-
Click the Connect button or press Shift+Enter.
A connect edit uses the position indicator as your In point to edit the asset above the Main track. If you are editing an asset at a point where there is already an additional video/audio track in the sequence, the connect edit places the video and/or audio on a new track.
n If you are editing your first asset into the sequence, the Connect button is unavailable.
-
Click the Insert button or press W to complete an insert edit on the Main track.
This function uses the position indicator as your in point.
-
Click the Overwrite button or press Q to complete an overwrite edit on the Main track.
This function uses the position indicator as your in point.
n If you are editing your first asset into the sequence, this function is unavailable.
-
Click the Append button or press Enter to edit the source asset to the end of the final segment on the Main track.
-
Drag and drop the asset from the Source monitor to the timeline. You can do any of the following:
-
(Main track) Drag the asset to the beginning of the sequence to make it the first edit.
-
(Main track) Drag the asset to any segment break in the middle of the sequence to perform an Insert edit.
-
(Main track) Drag the asset to the end of the sequence.
-
Drag the asset above the Main track to edit the asset to a new track.
-
Shift+select or Ctrl+select multiple assets from the Project Bin to drag and drop multiple assets to the timeline simultaneously.
n You cannot drag and drop assets from another area of Avid Content Core directly to the Sequence Timeline. Dragging an asset to the Web Editor adds the asset to the Project Bin.
-
-
Drag and drop an asset from the Project Bin directly to the sequence timeline.
This action adds the entire clip to the sequence, ignoring any Mark In or Out points that might be added to that asset.
-
Rearranging Segments in the Timeline
After you edit a segment into the timeline, you can subsequently move that segment to another point in the timeline through a simple drag and drop edit. When you use this method, the app performs an insert edit automatically. You cannot use the drag and drop process to make an overwrite edit.
To reorder segments using drag and drop:
-
Click and hold a segment in the timeline.
-
Drag the asset to another track or between two other assets and release the mouse to make the edit.
Note the following:
-
If you are dragging a segment to the beginning or middle of two other segments in the Main track, a boundary box appears to show you where the edit will occur.
-
You cannot drag and drop a segment between two other connected segments on a non-Main track.
-
If you are not working on the Main track, the track must have enough space to drop the segment. For example if you have 10 seconds of empty space on "track 2" and your segment is 20 seconds long, the edit is not allowed.
-
Copying and Pasting Content
The Editor app allows you to copy sections of the sequence and paste them back into the same sequence, or into any other Editor app sequence.
Chrome includes a security setting that can prevent sites from accessing your workstation's clipboard. The following process requires you to allow access to the clipboard by adjusting your Chrome settings. If this setting is not configured, Chrome might prompt you for your preference when pasting the asset back into the sequence.
To duplicate sections of your sequence:
-
Use the Editor Sidebar to find and load a sequence into the Sequence Timeline.
-
Do any of the following:
-
Click an segment in the timeline to select it.
-
Shift+click, Ctrl+click (Windows), or Cmd+click (Mac) to select multiple assets.
-
Shift+click and drag your mouse from top-left to bottom-right to create a lasso around one or more segments.
All segments touched by the lasso are selected.
-
Shift+click and drag your mouse from top-right to bottom-left to create a lasso around one or more segments.
Only segments that are completely inside the lasso are selected.
-
-
Press Ctrl+C (Windows) or Cmd+C (Mac) to copy your selection.
-
(if applicable) Keep your current sequence in the Editor app, or load a new sequence.
-
Move the position indicator bar to the point on the sequence where you want to past the selection.
-
Press Ctrl+V (Windows) or Cmd+V (Mac) to paste your selection.
Removing a Segment from the Sequence
After you edit a segment into the timeline, you can subsequently remove that segment at any time.
If you are working in the Main track and you delete an asset in the middle of two others, the gap left by the delete action is closed automatically. If you are familiar with editing in either Media Composer or MediaCentral Cloud UX, the Web Editor does not have the concept of Lift.
If you are working in any other track, the asset is removed with no downstream changes on the same track in the sequence.
To delete one or more segments from the timeline:
-
Do any of the following:
-
Click an individual segment to select it.
-
Shift+click multiple segments to multi-select.
-
Shift+click and drag your mouse from top-left to bottom-right to create a lasso around one or more segments.
All segments touched by the lasso are selected.
-
Shift+click and drag your mouse from top-right to bottom-left to create a lasso around one or more segments.
Only segments that are completely inside the lasso are selected.
-
-
Click the Backspace or Delete button on your keyboard.
To delete a section of a timeline:
-
Mark In and Out points around the section of the sequence that you want to delete.
An area of the Main track is highlighted.
-
Press the Delete or Backspace key on your keyboard.
The marked area on your Main track is deleted.
Configuring a Thumbnail Image
When you render your output for publishing, the sequence is associated with a thumbnail image that is used to represent the sequence in the publishing workflow. The thumbnail is generated automatically using the first frame of the first asset in the sequence by default. However, you can set a custom thumbnail using any frame in your edited sequence.
n If you set a custom thumbnail image and subsequently delete the segment from the timeline that included that image, the thumbnail remains associated with that original frame of media (even though it is no longer part of the sequence).
To configure a custom thumbnail:
-
Move your position indicator bar to the point on the timeline where your representative image is located.
-
Press the T key on the keyboard.
The app adds a small dot icon to the Timing bar at the top of the sequence to help you identify the thumbnail image.
The Thumbnail is a representative image of what you see in the Record monitor. If you are parked over a section of the sequence that has multiple layers and affects, all of that is captured as part of the thumbnail. You cannot selectively create a thumbnail from the media on a lower level track.
-
Click the Render button to save the thumbnail image.