Using the Clip Inspector
The Clip Inspector provides you access to multiple tools that can help you enhance your assets and your edited sequence. This panel is divided into the following tabs:
-
Transform
-
Mask
-
Speed
-
Color
-
Blur
-
Keying
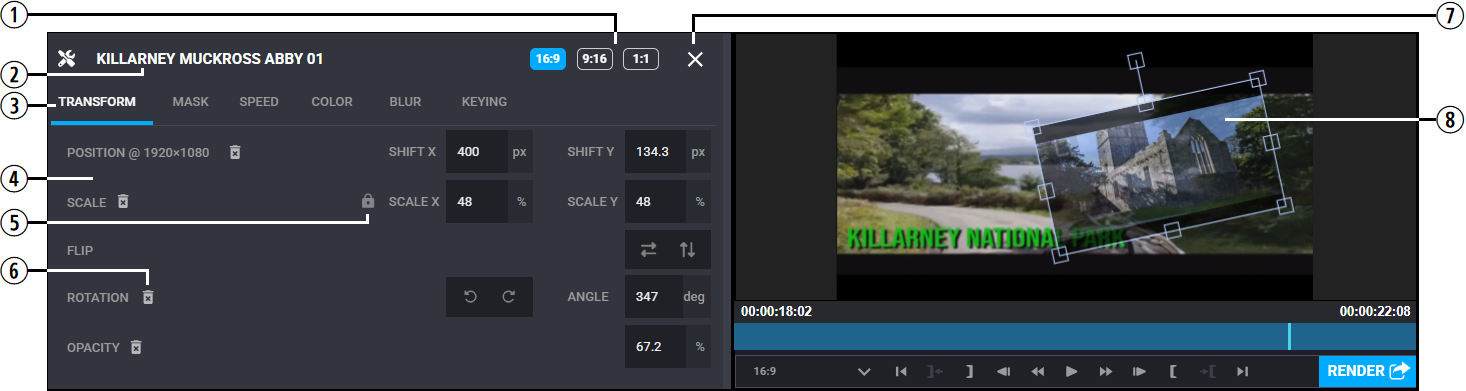
The following illustration shows the Clip Inspector's Transform controls with custom values added to each of the parameters. The Record monitor shows how these changes effect a new segment that has been added above the Main track.
|
# |
Name / Description |
|---|---|
|
1 |
Aspect Awareness controls. Work similarly to the controls available in the Graphic Designer. For details, see Using the Aspect Awareness Controls. |
|
2 |
Name of the asset /segment that will be effected by changes to the Clip Inspector. |
|
3 |
Clip Inspector tabs area. |
|
4 |
Controls available for the selected tab. |
|
5 |
Lock (gang). Some parameters are ganged together by default. When you adjust one value (for example the X scale), the associated parameter (for example the Y scale) is adjusted by the same amount. You can click the Lock button to break the link between these values and adjust them individually. |
|
6 |
Delete. When you change a parameter from its default, a trash (delete) icon appears to the right of that control. You can click this button to reset that parameter back to its default value. |
|
7 |
Closes the Clip Inspector. |
|
8 |
(Transform Only) Segment controls in the Record monitor allow you to use your mouse to free transform the segment. |
Many of the parameters and controls available in the Clip Inspector are similar to those available in the Graphic Designer. For more information, see Adding Titles and Graphics.
Accessing the Clip Inspector
After you load a sequence that includes at least one video asset, you can complete the following steps to access the Clip Inspector and use the features within this tool.
As these are video-based effects, you cannot use the Clip Inspector with audio-only segments.
To open and use the Clip Inspector:
-
 Click the Open Clip Inspector button in the Timeline Controls area of the user interface.
This loads the Clip Inspector UI into the Web Editor's Source monitor.
-
(if applicable) Select a segment in the Sequence that you want to manipulate.
-
If you do not select a specific segment, the Clip Inspector defaults to manipulating the segment that is located at the blue position indicator on the sequence's Main track.
-
Click a segment on an alternate track to load that segment into the Clip Inspector.
-
-
Select a tab within the tool (for example Mask, Color, or other).
-
Do any of the following:
-
Type an alternate value into any of the parameters in the Clip Inspector's interface.
-
Click one of the parameters, hold the left-mouse button, and drag your mouse left or right to adjust the value for that parameter.
-
Use your mouse to manipulate the segment directly in the Record monitor.
-
Use advanced controls in tools such as Speed or Blur to manipulate the asset.
Whenever you make an adjustment, a blue dot appears to the left of the tab as a visual indicator that a change has been made to this tab.
-
-
(optional) Select another tab to continue to adjust the parameters for this segment.
-
(optional) Click the Reset button in the bottom-right corner of the tab to revert any of the changes that you made to this tab.
-
Click the Close button in the upper-right corner of the Inspector to exit.
Using the Clip Inspector Transform Tab
Transform lets you display multiple segments on screen at the same time by adjusting their scale and position. This feature is also commonly used to zoom in on a clip to allow a tighter framing than what was originally captured.
The following table describes the controls in this tab.
|
Name |
Description |
|---|---|
|
Position |
Allows you to change the position of the segment. |
|
Scale |
Stretches the object vertically and / or horizontally. |
|
Flip |
You can click the Flip Horizontal or Flip Vertical buttons (or both) to enable these changes to the image. |
|
Rotation |
You can click the Rotate Counter-Clockwise or Rotate Clockwise buttons to rotate the image by 90 degrees on the Z axis. If you click either of these buttons four times, the image is returned to its original angle. Alternatively, you can enter a value in the text field to define a custom rotation. |
|
Opacity |
Sets the object transparency from solid (100) to opaque (0). |
Using the Clip Inspector Mask Tab
Mask allows you to crop your clips by defining a custom visible area, effectively hiding everything outside of the frame. This is useful when layering clips and when wanting to focus attention on a specific part of the frame. You can use a mask to highlight, hide, or combine visual elements.
The following table describes the controls in this tab.
|
Name |
Description |
|---|---|
|
Position |
Applies a mask to the fame. This feature acts similar to a crop tool. |
|
Scale |
Shift/Scale X applies a mask to the left and right sides of the frame. Shift/Scale Y applies a mask to the top and bottom of the frame. |
Using the Clip Inspector Speed Tab
The Speed tab allows you to increase or decrease the playback speed of any segment of your sequence. You can also use this feature to create a freeze frame from any segment in your sequence.
To use this feature:
-
Follow the process for Accessing the Clip Inspector to select an asset and open the Clip Inspector.
-
Select the Speed tab.
-
Select the segment on the timeline that you want to adjust.
-
Select an option from the Keep controls:
-
Source In and Out: The asset length is increased or decreased which results in a change to the total length of the sequence.
-
Source In: The segment in-point remains the same and the out-point is adjusted. The sequence length remains the same.
-
Source Out: The segment out-point remains the same and the in-point is adjusted. The sequence length remains the same.
-
-
Do any of the following to change the playback speed of this asset:
-
Enter a custom value into the Playback Speed field.
-
Drag and drop the dot on the Playback Speed timeline to a different value.
-
Create a freeze-frame effect by moving the Position Indicator Bar over your desired frame and set the playback speed value to zero.
The Source Duration and Duration on Timeline values display the original length of the segment, and that of the adjusted length after the speed effect is applied.
-
Using the Clip Inspector Color Tab
The color tools allow you to color-correct assets, or alter the look of an asset to achieve a new visual style — such as an "old timey" sepia tone. If your administrator has created multiple Output settings with different aspect ratios, you should know that color changes apply to all aspect ratios. This is in contrast to other tabs such as Transform and Mask which can be customized for each aspect ratio.
The following table describes the controls in this tab.
|
Name |
Description |
|---|---|
|
Brightness |
Adjusts the luminance of the image. |
|
Contrast |
Adjusts the sharpness and detail of the image. |
|
Exposure |
Adjusts the virtual exposure of the image to lighten or darken the image. |
|
Hue |
Adjusts the hue values (red, green, blue). |
|
Saturation |
Adjusts the intensity of the Hue value. |
Using the Clip Inspector Blur Tab
The Blur tool allows you to obscure faces or objects in your video asset. Blur automatically tracks and keyframes the objects throughout the video segment. After the initial pass is complete, you can further customize the blur settings or mark additional objects for tracking.
To use the blur face detection feature:
-
Follow the process for Accessing the Clip Inspector to select an asset and open the Clip Inspector.
-
Select the Blur tab.
-
Click the Detect Faces button.
The app begins an analysis of the video segment that you cut into the sequence. Assuming that it can detect at least one face on the current frame, that face is outlined in the Record monitor by a blue oval. If you are parked on a frame of video that either does not include any people or the people cannot be identified automatically, the app displays a "No faces detected on this frame." message in the Clip Inspector.
n In some cases, the blur auto-recognition feature might detect animal faces/heads as well, but this feature is designed primarily to look for human faces.
When the analysis is complete, the Clip Inspector provides additional options.
-
Select a Preset from the menu.
Each preset is designed with specific images in mind. For example, the Interview preset assumes one or two faces in the frame and increases the sensitivity and number of skip frames. In contrast the Crowd setting greatly increases the number of faces, but lowers other settings.
If you adjust any of the settings on this page, the preset menu switches to the Custom option automatically.
-
Adjust additional options as necessary.
You can hover over the name of each setting to display a description of the value.
-
Select the check box(es) next to the face(s) that you want to blur and then click the Apply Blur button.
The app displays a progress bar as the effect is applied. When the processing is complete, the result is displayed in the Record Monitor and additional settings appear in the Clip Inspector.
If you enabled the checkbox for two or more faces, the Inspector shows Person 1, Person 2, Person X buttons that allow you to adjust settings for each individual blur.
-
(optional) Adjust settings to alter the look of the blur
-
(optional) Click the chevron to the left of the Keyframes value to display the keyframes. This area allows you to:
-
Select individual keyframes and adjust the values for that keyframe.
-
After selecting a keyframe, you can click the Trim Left or Trim Right buttons trim (delete) all keyframes to the left or right of your selected keyframe.
-
-
(optional) Click the Detect Faces or New Region buttons to track and add blur effects to other areas of the image.
To use the object detection feature:
-
Follow the process for Accessing the Clip Inspector to select an asset and open the Clip Inspector.
-
Select the Blur tab.
-
Click the New Region button.
The Inspector displays a series of settings that you can use to determine how the blur effect is processed.
-
(optional) Select a Preset from the menu.
Selecting a preset defines how the blur effect is processed which can lead to a more accurate final product. For example you might select the Fast Motion preset for a bird that quickly flies through your frame. In contrast this same preset might not be as applicable to a car's license plate in slow moving traffic.
If you adjust any of the settings on this page, the preset menu switches to the Custom option automatically.
-
Click and drag an area in the Record Monitor to select the area of the frame or object that you want to blur.
The app immediately begins to analyze the video and create the effect after you release your cursor.
-
(optional) Adjust settings to alter the look of the blur
-
(optional) Click the chevron to the left of the Keyframes value to display the keyframes. This area allows you to:
-
Select individual keyframes and adjust the values for that keyframe.
-
After selecting a keyframe, you can click the Trim Left or Trim Right buttons trim (delete) all keyframes to the left or right of your selected keyframe.
-
-
(optional) Click the chevron to the left of the Retrack value to repeat the video analysis with a different preset or settings.
-
(optional) Click the Detect Faces or New Region buttons to track and add blur effects to other areas of the image.
Using the Clip Inspector Keying Tab
The Keying tab allows you to exclude a color from an image. This feature is typically used with "green screen" or "blue screen" backgrounds to allow a subject to be superimposed over an alternate background.
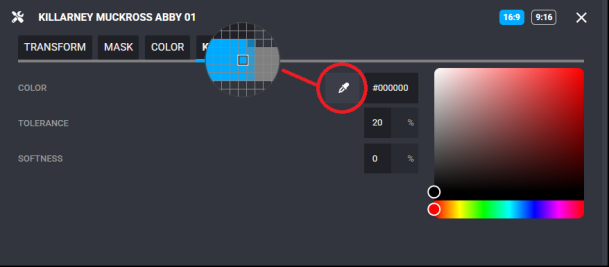
As shown in the following illustration, this tab includes a eye-drop tool that allows you to select a specific color from any image that is displayed on your workstation's monitor (another app, your desktop wallpaper, or other). In this example, the editor is selecting the blue underline color that is displayed below the Keying tab.
|
Name |
Description |
|---|---|
|
Color |
Select a color by doing one of the following:
|
|
Tolerance |
Defines the color range that will be keyed-out by the effect. |
|
Softness |
Allows you to blend the edges of the key to achieve a more natural look. |