Adding Transition Effects
The Editor app allows you to add transition effects between segments in the Sequence Timeline. When you add a transition, the effect is centered on the cut by default. However, you can adjust the parameters of the effect to either start or end at the edit point.
Sequences allow you to add transition effects over audio segments as well. In the context of an audio-only dissolve, the effect is referred to as a fade or cross fade.
The only restriction to the length of the transition is that it cannot extend beyond the asset or assets to which it is applied. The transition extents (number of leading or tail frames) are limited by:
-
You must have enough underlying media of either segment to support the transition.
-
Any existing transition extending from the other end of the segment. In other words, you cannot overlap two transitions on the same track.
-
The start and end of the sequence. For example, you cannot add a Centered transition to the end of the sequence.
n If you trim a segment to a duration that is shorter than the transition duration, the transition is deleted from the sequence automatically. The effect is also removed automatically if you delete a segment from the sequence that includes an overlapping effect.
To add a transition effect:
-
Move the position indicator bar on the Sequence Timeline to your desired transition point.
-
Do one of the following:
-
Click the Add Transition button in the Timeline Toolbar Controls.
-
Press D on the keyboard.
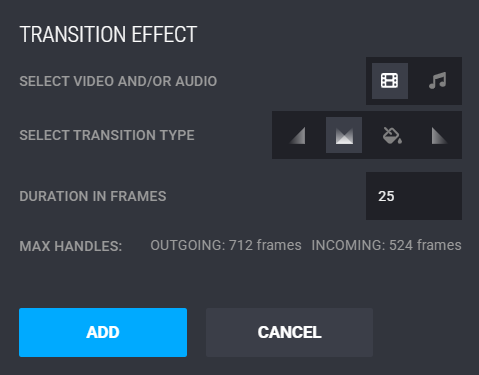
The transition effect dialog window appears.
-
-
Click the Video button, the Audio button, or both to determine how and where the effect is added.
-
Select a transition type option:
-
Fade In
-
Cross Dissolve or Audio Cross Fade
-
Fade Out
-
Dip to Color (video only)
-
-
Select the duration for the effect (in number of frames).
If you enter a different value than what is displayed, the app displays a Set Default button. You can click this button to use the value you just entered as the new default for all transition effects. This value applies to all three effect types. You cannot set different default values for the Fade In/Out and Cross Dissolve. Default values are saved on a per-user basis.
-
(Dip to Color only) Use the on-screen controls to select a color.
-
Do either of the following:
-
Click Add to add the transition to your sequence.
-
Click Cancel to exit without adding the transition effect.
-
To edit a transition effect:
-
If you want to alter the length of the transition only:
-
Double-click the transition in the timeline to open the dialog window.
If you use this method, all other settings are locked out.
-
Enter a new duration value.
-
Click Update.
-
-
If you want to reconfigure any setting related to the effect:
-
Move the position indicator bar on the Sequence Timeline to your desired transition point.
-
Click the Add Transition button in the Timeline Toolbar Controls, or press D on the keyboard.
-
Update the effect settings.
-
Click the Replace button.
-
To trim a transition on the timeline:
-
Navigate to the location of your effect on the timeline.
-
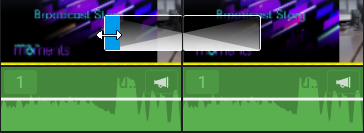
Hover your cursor over the start or end of the effect.
Similar to standard trim mode, the cursor changes to a double-sided arrow.
-
Click and drag the transition to a new position to change the duration.
If you are altering a centered dissolve effect, both sides of the effects are increased or decreased by the same amount.
To delete a transition effect:
-
Navigate to the location of your effect on the timeline.
-
Click the effect.
A blue boundary box appears around the effect to confirm that it has been selected.
-
Press the Backspace or the Delete key on the keyboard to delete the effect.