Using the Player Monitor and Tabs
The Avid Content Core Player provides a professional-grade media viewer that enables you to play proxies of your organization's high-res video and audio assets. The Player provides frame-accurate playback, intuitive scrubbing, and easy access to metadata, transcripts, and segment data such as Production Management Marker comments, all without requiring any local downloads of high-res assets.
The Player is divided into two areas: the Player Monitor and the Player Tabs.
Working with the Player Monitor
The ACC Player is capable of playing Avid Production Management or MediaCentral Production Management master clips, and sequences that are created through the ACC Web Editor.
Whenever your on-prem MediaCentral Cloud UX detects a new Production Management master clip, it initiates the creation of a 1080p proxy for that asset. The on-prem system creates the proxy and pushes the media up to Avid Content Core.
In the event that an asset is not already associated with a proxy and you attempt the load that asset into the Player, the Web Editor, or another area of the user interface that allows for asset playback, Avid Content Core initiates the creation of the proxy media which becomes available shortly after you load the asset. If other users have requested new media, or if there are other on-prem tasks that are using the resources required to create the proxy, your request is queued for processing. When the proxy media is available, the asset appears automatically for playback.
The following illustration shows the Player Monitor and its controls.
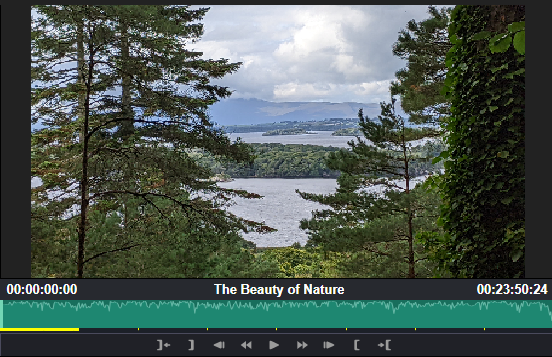
When you load an asset into the monitor, the following occurs:
-
The monitor controls become active (available for use).
-
The position indicator panel populates with the name of the asset and timecode values.
The player displays the asset using absolute timecode in which the first frame is always 00:00:00:00. This is different from the Source monitor in the Web Editor app which allows you to toggle between absolute and source timecode.
-
The position indicator panel displays a visual representation of the asset's audio levels (if applicable).
-
The app pre-loads a portion of the asset for playback (as indicated by the yellow bars).
If you load a Web Editor sequence that is actively being edited, the Player displays the changes to the sequence automatically (no manual refresh required). Edits appear in the Player shortly after they are made. If you have not previously viewed an asset that has been edited into the sequence, those assets might temporarily appear as a black hole in the sequence. These spaces are filled in with the source media after a short period of time.
Opening and Closing the Player
The Player appears in the user interface in a collapsed panel by default.
To open or close the Player:
-
 Click the chevron near the top-right area of the user interface to open the Player.
 -
 Click the chevron near the top-right area of the user interface to hide the Player.
Resizing the Monitors
The Player allows you to resize the space allocated to both the Player panel and the space allocated to the Monitor and Tabs areas.
To vertically resize the Player:
-
Hover your cursor over the areas between the Player and the Main app area to the left.
The separator bar turns into a double-sided arrow.
-
Drag and drop the separator bar to a new position to alter the amount of space allocated to the Player Monitor and Tabs.
To horizontally resize the Player:
-
Hover your cursor over the areas between the Player Monitor and Tabs.
The separator bar turns into a double-sided arrow.
-
Drag and drop the separator bar to a new position to alter the amount of space allocated to each area of the Player.
Loading Assets into the Player
You can do any of the following to load supported assets into the Player. Avid Content Core supports the ability to open only a single asset in the Player at any one time.
-
Double-click an asset to load that asset into the Player.
This action opens the Player automatically (if closed). This option might be dependent on your default app preferences. For more information, see Choosing the App for Opening Assets.
-
If the Player is already open, you can drag and drop an asset to the player.
-
Right-click on an asset in an area of Avid Content Core that supports this action and select: Open In > Web Editor.
For additional information, see Choosing the App for Opening Assets.
Media and Playback Controls
The button bar below the Player Monitor contains various controls you can use when viewing, and playing assets. The following table describes the Player controls.
|
Icon |
Name |
Description |
|---|---|---|
|
|
Go to In |
Moves the position indicator to the In point. If you do not set a custom In point, the position indicator bar moves to the beginning of the asset. |
|
|
Mark In |
Sets a point that defines the beginning of a segment |
|
|
1 Frame Back |
Moves the position indicator bar one frame back |
|
|
Rewind |
Plays the asset in reverse at various shuttle speed increments. Equivalent to the use of the J key. For additional information, see Using the J-K-L Keys for Playback. |
|
|
Play / Pause |
Click to play the media; click again to pause the media. |
|
|
Fast Forward |
Plays the asset forward at various shuttle speed increments. Equivalent to the use of the L key. For additional information, see Using the J-K-L Keys for Playback. |
|
|
1 Frame Forward |
Moves the position indicator bar one frame forward |
|
|
Mark Out |
Sets a point that defines the end of a segment |
|
|
Go to Out |
Moves the position indicator to the Out point. If you do not set a custom Out point, the position indicator bar moves to the end of the asset. |
Using the J-K-L Keys for Playback
The J-K-L keys on the keyboard allow you to play and shuttle through media at varying speeds. This feature, also referred to as three-button play or variable-speed play, allows you to use three fingers to manipulate the speed of playback for greater control.
The playback speed is displayed to the right of the timecode field in the bottom-left corner of the Player Monitor, or the Source and Record monitors in the Web Editor app. Each time that you press L or J, the playback speed is doubled up to a maximum of 512 times the original speed. While the video media plays at any speed, audio playback is muted after reaching a 32x or faster playback speed.
n Audio scrubbing on JKL playback is audible in forward playback only.
To play or shuttle through the media using the JKL keys on the keyboard:
-
With focus in the Player Monitor, or in the Source monitor, Record monitor, or Sequence Timeline area of the Web Editor app, do any of the following:
-
Press the L key to move forward through the footage at normal speed.
-
Press the L key multiple times to move forward through the footage at faster speeds.
-
Press the J key to move backward at the same shuttle speed increments.
-
Press the K key to stop playback.
-
Press and hold the J or L keys to play at 1/2 speed.
-
Exploring the Player Tabs
The Tabs area of the Player provides tools that allow you to interact with an asset.
-
The Metadata tab lets you view properties that are associated with the asset opened in the Player. For more information, see Using the Metadata Tab.
-
The Transcript tab shows the timecode-marked speech to text output of your asset. The text is added to segments that are automatically divided by each individual speaker. For more information, see Using the Transcript Tab.
-
The Segments tab provides features for viewing metadata added to clips at particular timecodes. Using the Segments tab you can view the following:
-
Markers and restrictions of Production Management assets. Production Management assets include an All markers layer (which displays all markers from all tracks) as well as a Restrictions layer.
-
Content descriptions show AI generated descriptions of your video asset.
-
Temporal Hits provide information about the location of semantic matches that are returned through a semantic search and of segments that are returned through a Markers & Segments search.
You can control the layer display through a selection menu that is located at the top of the Segments tab. For more information, see Using the Segments Tab.
-