Publishing Sequences
When you have finished your edit, you can use the Editor app to publish your sequence to one or more destinations such as Facebook, Instagram, TikTok, X, or other. The output options for your organization are determined and configured by your system administrator. For more details on Outputs and Social Media settings, see Configuring the Web Editor Settings.
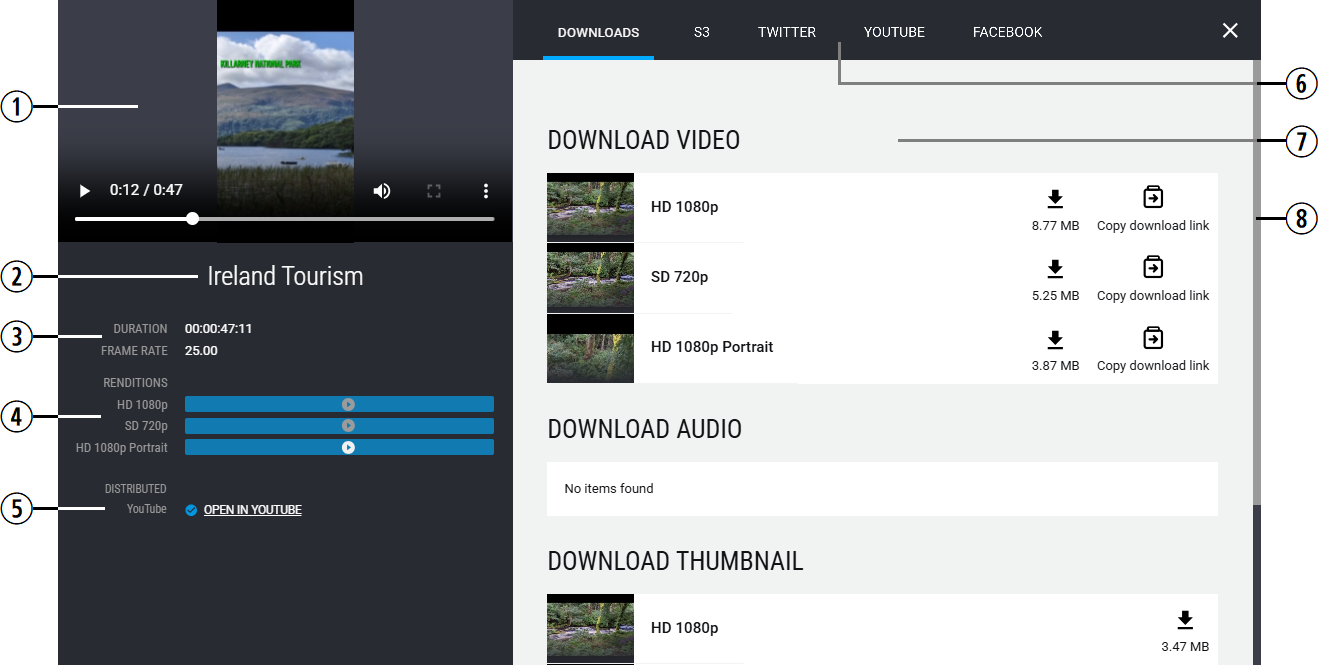
As sequences can include multiple tracks of audio and video, all sequences must be rendered down to a flattened MP4 file before you can publish them. This process happens automatically after clicking the Render button. The amount of time required to render your sequence is dependent on its length and complexity. The following illustration and table explain the different areas of this window.
|
# |
Name |
Description |
|---|---|---|
|
1 |
Preview Monitor |
Allows you to view your final output prior to publishing it. The Preview monitor loads the output of the first rendition by default. In this example illustration, the monitor is playing the Social Media Portrait 9:16 video because the user selected to play that version from the list of renditions below. |
|
2 |
Name |
Displays the name of your sequence. |
|
3 |
Output Information |
Displays the duration and frame rate of the final output. The frame rate is defined by the original format of your sequence and cannot be changed. |
|
4 |
Renditions List |
The renditions reflect the names of the profiles that are created in the Output Settings. As the render job is processed, the progress bars display their current state and percentage of progress. If you click any of the blue rendition bars, the associated video is loaded into the Preview monitor.
|
|
5 |
Distributed |
After you publish a sequence, the page displays a list of all the destinations that you have distributed to. You can click the link associated with each output to open the sequence on that platform. |
|
6 |
Destination Options |
The tabs at the top of the window show the different publishing options. If you have created one or more social media destinations, they appear here. If you have multiple accounts configured for the same destination, the app displays a drop-down list when you click the tab. |
|
7 |
Options / Settings |
Shows the options available for the currently selected publishing output. The example illustration shows the Download option. |
|
8 |
Scroll Bar |
In some case you might need to scroll down to see all available options or settings. |
Rendered output files are saved to cloud storage and are automatically cleaned (deleted) after a week. If you publish an output to a destination, this internal maintenance has no effect on the availability of that content on your destination platform.
To publish your sequence:
-
Use the Editor Sidebar to find and load a sequence into the Sequence Timeline.
-
(if required) If the Render button is red, it means that your sequence includes offline assets. You must either remove the offline assets, or contact your local administrator if this is an unexpected situation.
You cannot publish a sequence that include offline assets.
-
Click the Render button in the Record Monitor Controls bar.
The app displays a new window that provides you information about the rendering process.
-
Configure your output options.
For more information on these settings, see the documentation provided by your publishing vendor (Facebook, X, etc).