Using the Rules Simulator for Consistency Checks
 The Rules Editor provides a "Rules Simulator" utility that lets you test or debug rule initiation and expressions. Using the Rules Simulator, you can do the following:
-
Define the change event against which expressions and rules are to be evaluated.
-
Test expressions used in the rule against the defined change event.
-
Test if a certain rule or any rule in the Rule DB trigger on the defined change event.
See the following topics:
The Rules Simulator Window
Unlike most other areas of the Avid Content Core admin user interface, the Rules Simulator tool is a floating window that appears initially at the bottom-right corner of the user interface. You can move the window around your screen, or close and reopen it at your leisure to evaluate other rules or expressions. When you reopen the tool, the system displays the window in its last known position. You can also vertically resize the window to change the visible area.
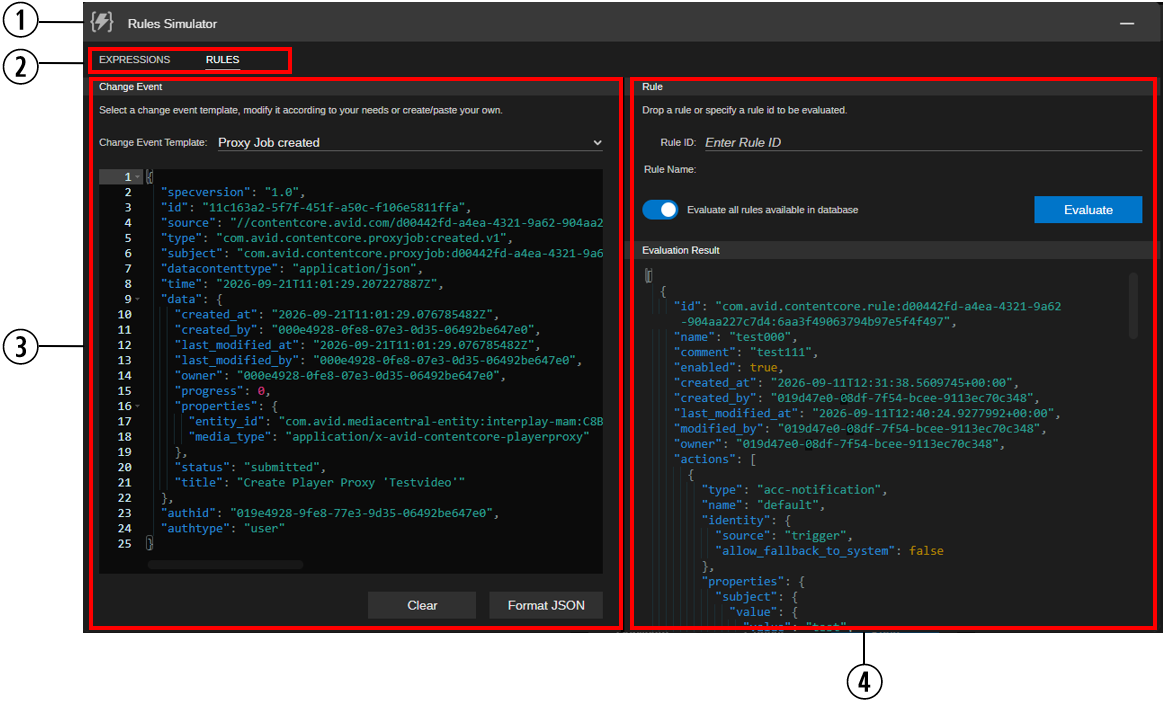
The Rules Simulator window is divided between four primary areas, as described in the following illustration and table.
|
|
Pane |
Description |
|---|---|---|
|
1 |
Toolbar |
The toolbar is a "drag handler" that allows you to move the window and includes the Minimize application button to close the window. |
|
2 |
Tabs |
The EXPRESSIONS and RULES tabs let you toggle between the Expression and Rule pane on the right-hand side of the window. By default, the Expression pane is shown. |
|
3 |
Change Event pane |
The Change Event pane is always shown. Use the Change Event pane to define a change event against which expressions and rules are to be evaluated. The Change Event pane shows the following:
For more information, see Defining a Change Event. |
|
4 |
Expression/Rule pane |
Depending on the selected tab, the Expression or Rule pane is shown on the right-hand side of the Rules Simulator window. Use the Expression pane to formulate or paste a used expression and to evaluate the expression against the change event. The Expression pane shows the following:
|
|
|
|
Use the Rule pane to provide a Rule ID and to evaluate the rule against the change event. You can also evaluate all rules in the rules DB. The Rule pane shows the following:
|
To open the Rules Simulator window:
-
Click the Open Simulator button on the Rules Editor toolbar.
-
Open an action where you used an expression, then open the Edit Expression dialog box for the field of type Expression and in the dialog box click the Open Simulator button. See Using Expressions.
The window appears initially at the bottom-right corner of the user interface. If you already opened the Rules Simulator during your current session and changed its position, the window appears at this position. If opened from the Edit Expression dialog box, the expression is already inserted in the Rules Simulator.
To move the Rules Simulator window:
-
Click on the toolbar and move the window to change its position.

The window retains its position for the length of your current user session.
To resize the Rules Simulator window:
-
Click and drag the top or the bottom of the window to change its size.
The window retains this size for the length of your current user session.
You cannot expand the size of the window on a horizontal scale.
To resize the panes in the Simulator window:
-
Click the vertical border between two panes and drag it to the left or right to change their size.
The window retains the pane size for the length of your current user session.
To close the Rules Simulator window:
-
 Click the Minimize application button on the Rules Simulator toolbar.
The window is closed. Contents, size and position are maintained for the length of your user session and are restored when you re-open the window. When you close the browser, the system removes all content from the Rules Simulator window.
Defining a Change Event
Rules always trigger based on events. Therefore, you first must define a change event against which you then can evaluate an expression or a rule. You have the following options to define a change event:
-
Use a change event template provided in the Rules Simulator and modify it in the Change Event pane.
-
Use a Kafka Client to retrieve the JSON of a change event and paste it to the Change Event pane.
The Rules Simulator's Change Event Template list provides templates for the following:
-
Proxy Job created
-
Proxy Job updated
-
Proxy Job deleted
To define a change event:
-
Click the Open Simulator button on the Rules Editor toolbar.
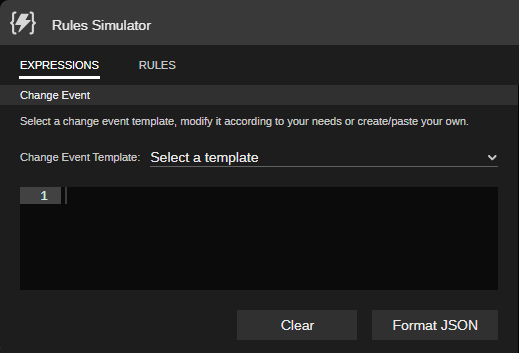
The Rules Simulator window opens.
-
Do one of the following:
-
Select a change event template from the Change Event pane's Change Event Template list.
-
Paste a copied change event JSON to the JSON display and formatting panel.
-
-
Edit the JSON in the JSON display and formatting panel as needed.
Once input is provided or changed, the Rules Simulator validates the JSON schema when you click outside the JSON display and formatting panel. Errors are shown in red below the JSON display and formatting panel, as illustrated in the following example for change event schema errors.

If you violated the JSON structure, a Syntax Error is shown. Change event schema messages are hidden until the JSON syntax error is repaired. After that, the hidden event schema messages are shown again.

As long as the event JSON is invalid, the Simulate and Evaluate buttons are inactive.
-
(optional) If you pasted a change event into the JSON display and formatting panel, click the Format JSON button to format the input in a valid JSON format.
-
(optional) To remove the contents from the Change Event pane, click the Clear button.
Evaluating an Expression
Defining expressions in actions is a very powerful but not easy to use option. Therefore, the Rules Simulator lets you evaluate expressions against a defined change event in its Expression Simulator pane.
You have several options to insert an expression to be evaluated in the Expression pane:
-
Type an expression.
-
Copy and paste an expression.
-
Directly insert an expression by opening the Rules Simulator from the Edit Expression dialog box in an action.
Vice versa, you can also copy an evaluated expression in the Expression pane and then paste it into the Edit Expression dialog box of an action's Expression field. See Using Expressions.
To manually enter and evaluate an expression:
-
Click the Open Simulator button on the Rules Editor toolbar.
The Rules Simulator window opens.
-
In the Rules Simulator's Change Event pane, define the change event against which the expression is to be evaluated. See Defining a Change Event.
-
(if needed) Click the EXPRESSIONS tab to show the Expression pane.
-
Insert an expression in the Expression pane.
-
Click the Simulate button.
The results of the evaluation are shown in the "Simulation Result" panel.
In error case, an error message opens.
-
(optional) To remove the contents from the Expression pane, click the Clear button.
To evaluate an expression already used in an Edit Expression dialog box:
-
Open an action that uses an expression in the Rules Editor's Details pane.
-
 In the Details pane, hover the cursor over the field of type Expression and click the "Edit expression" button that is shown.
The Edit Expression dialog box opens.
-
 In the Edit Expression dialog box, click the Open Simulator button.
The Rules Simulator window opens. The expression is already entered in the Expression pane.
-
In the Rules Simulator's Change Event pane, define the change event against which the expression is to be evaluated. See Defining a Change Event.
-
Click the Simulate button.
The results of the evaluation are shown in the "Simulation Result" panel.
In error case, an Expression Evaluation Error message opens.
-
(optional) To remove the contents from the Expression pane, click the Clear button.
Evaluating Rules
The Rules Simulator lets you evaluate rules against a defined change event. The evaluation checks if the rule triggers on the event. You have the following options:
-
Evaluate a single rule against the defined change event.
-
Evaluate all rules in the Rule DB against the defined change event.
To evaluate an individual rule:
-
Open the Rules Editor app.
-
Select a system/rule type from the sidebar.
-
Open the rule via drag and drop:
-
Open the Rules Simulator window.
-
In the Rules Simulator window, click the RULES tab to show the Rule pane.
-
Move or minimize the Rules Simulator window so that you see the Rules Editor's RULES tab.
-
In the Rules Editor, select a rule in the RULES tab's rules table and drag and drop it to the Rules Simulator's Rule pane.
-
-
In the Rules Simulator's Change Event pane, define the change event against which the rule is to be evaluated. See Defining a Change Event.
-
Click the Evaluate button.
If the rule matches, its JSON is shown in the Evaluation Result panel.
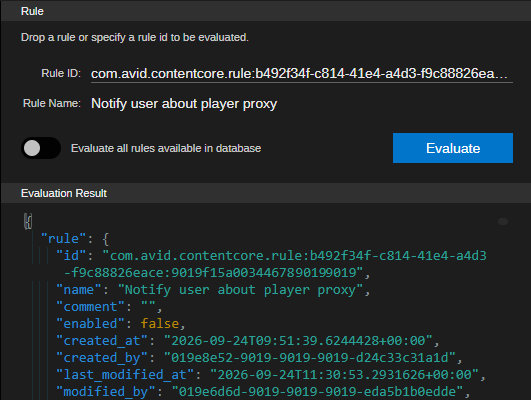
In error case, an error message opens.
To evaluate the full Rule DB:
-
Open the Rules Editor app.
-
Select a system/rule type from the sidebar.
-
Open the Rules Simulator window.
-
In the Rules Simulator's Change Event pane, define the change event against which the Rules DB is to be evaluated. See Defining a Change Event.
-
In the Rules Simulator window, click the RULES tab to show the Rule pane.
-
 In the Rule pane, click the "Evaluate all rules available in the database" toggle button so it turns blue.
 -
Click the Evaluate button.
The results of the evaluation – the JSON of all rules that match – are shown in the Evaluation Result panel. In error case, an error message opens.