Using the Results Toolbar and Search Results
The Results area located in the center of the app displays the assets returned from your current search. As illustrated below, the Results toolbar includes information about the search results as well as set of options that can be used to modify the view of the Results area.

After you complete a search, your results are displayed in the app until any of the following occurs:
-
You close the Search app.
-
You sign out of Avid Content Core, or your session automatically times-out.
The following section describes the features available in the Results toolbar — as shown from left to right.
Refresh Search
 The Refresh Search button updates the existing search results with any new assets that might have been created since the last time that you executed the search.
If you hover your cursor over the Refresh button, you are presented with the ability to enable an Auto-Refresh option that automatically updates your search results every 60 seconds. When in auto-refresh mode, you can still click on the Refresh button to manually update your search results.
n The 60 second refresh-rate value is hard-coded and cannot be customized.
If the auto-refresh fails to update the search results for any reason, a warning indicator appears to the right of the Refresh button. If you hover your cursor over the warning, a tool-tip appears that tells you how long it has been since the last update.
To enable auto-refresh:
-
Place your cursor over the Refresh button.
The Auto Refresh menu appear to the right of the button.

-
Click the "Auto refresh every 60s" button to enable the feature.
The menu turns blue to provide you with a visual confirmation of the change and the look of the Refresh icon changes.

When you move your cursor away from the menu, the menu disappears, but the Refresh icon maintains the updated look. Auto-refresh stays enabled until you do any of the following:
-
Manually disable auto-refresh
-
Clear the current search from the Search header
-
Close the Search app
-
Sign out of your current user session
-
View Options
The Results area is displayed in List view by default. However, you can change how the results are displayed by selecting the Card button in the Results toolbar. Depending on the selected view, assets are listed with varying levels of detail related to the associated metadata.
|
Button |
Name |
Description |
|
|
List |
This view displays the asset type icon, an asset headframe, and select metadata fields listed in columns. Columns can be reordered by dragging the column header to the left or right. |
|
|
Card |
This view displays the asset headframe, title, and select metadata fields. |


Sort By Menu
Although you might have already filtered your search, the Results area of an Advanced search can be further modified by selecting an option from the Sort By menu.
You can review the list of options by using the scroll bar on the right side of the menu. Alternatively if you are looking for a specific metadata value, you can use the filter option at the top of the menu to refine the list. If the term you use to filter the list returns too many values, you can enclose the term in quotes to look for an exact match value.
You can use the Descending / Ascending menu to flip the results form top to bottom or bottom to top, or you can click the column headers to sort the list.
All results from a Simple search are sorted automatically by ACC's rating system in which the most accurate or appropriate result is listed first, followed by other assets in a descending order. For this reason, the Sort By menu options and the ability to sort within individual columns of data in List view are disabled for simple searches.
Display Options
The Display Options menu allows you to add or remove columns to or from the Results area by selecting or deselecting check boxes in the menu.
Similar to the Sort By menu, you can scroll through the list or enter a term to filter the list. Columns can be reordered by dragging the column header to the left or right. Additionally, you can click on the header of any column (except for Icon and Thumbnail) to sort the results list by that column of data (advanced searches only).
Dynamic Range
HDR (high dynamic range) refers to video media formats that support a wider range of brightness and color values than traditional SDR (standard dynamic range) media. The Display Options menu includes a Dynamic Range option with the following values explained:
-
HDR (High Dynamic Range)
-
SDR (Standard Dynamic Range)
-
Mixed — Refers to an asset with multiple dynamically linked resolutions, where at least one is an SDR resolution
-
Unknown — Dynamic Range status is not available
-
Not Applicable — Asset does not support color space information
Avid supports displaying the Dynamic Range status for video master clips.
Media Status
When reviewing your assets, you can use the Media Status column to verify if proxy media exists for a specific asset. This allows you to quickly determine the proxy availability and current condition of your asset. It is displayed by way of icons that indicate the current state of your assets.
The following illustration shows an example of the Media Status indicators.
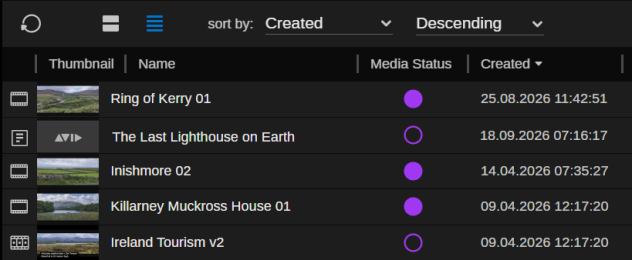
The Media Status property is enabled by default so you should be able to see the asset's proxy availability automatically in your search results. This applies to both Card and List view.
The following table briefly describes the Media Status indicators.
|
Indicator |
Description |
|---|---|
|
Purple circle |
Indicates that there is an available proxy media for the asset. |
|
Purple circle outline |
Indicates that there is no available proxy media for the asset. This indicator is also applicable to any asset that does not support proxies, such as file assets. This icon is also displayed for all Web Editor sequences, even if all of the media for that sequence is online. n If an asset does not yet have a proxy available, load the asset into the Player to initiate the creation of the proxy media. |


Selecting Assets in the Search Results
You can do any of the following to select assets in the Search Results area:
-
Single-click (once) to select a single asset
-
Ctrl+click multiple non-contiguous assets
-
Shift+click multiple contiguous assets
-
(List view only) With focus in the Results area, press Shift+Up or Shift+Down to select multiple contiguous assets