Configuring an Identity Provider
The first step in configuring your Avid Content Core system is to link your organization’s enterprise identity provider to ACC. This enables you to not only sign into Avid Content Core using your organization's standard user credentials, but also allows you — as an administrator — to determine which groups are associated with specific user roles.
The ACC Control Panel allows you to configure two types on identity providers:
-
OpenID Connect (OIDC)
-
SAML (Security Assertion Markup Language)
Prerequisites / notes:
-
Avid expects that you can employ any authentication provider, as long as it provides support for both OAuth 2.0 (OIDC or SAML compliant), and Group Claims.
n Avid does not qualify, nor prefer any specific IDP vendor, and cannot advise on the settings that might be required for each vendor.
-
Prior to configuring the ACC IDP settings, you must create an app within your OpenID provider for Avid Content Core.
Refer to the following processes to configure the settings that are appropriate for your organization.
To configure an OIDC-based identity provider:
-
Click the Create IDP button on the Identity Provider section of the portal.
The identity provider configuration wizard appears.
-
Enter a Display name for this IDP configuration setting.
This name is displayed on the Avid Content Core welcome screen for all users.
-
Click the OIDC button to select this IDP type.
-
Enter an optional description of this provider into the Description field. This information appears only within the ACC Control Panel.
-
Enter the following information into the portal:
-
Configure all fields in the OIDC Configuration section of the page.
Each text box includes sample text that provides you with example formatting.
You can obtain the Client ID and the Client Secret from the app that you created within your identity provider.
The remaining fields are somewhat standard for most OIDC deployments. While authentication provider administrators are already likely familiar with these fields, you might be able to access these settings through a URL. The following URL and illustration provide an example for Okta:
https://<your organization's name>.okta.com/.well-known/openid-configuration
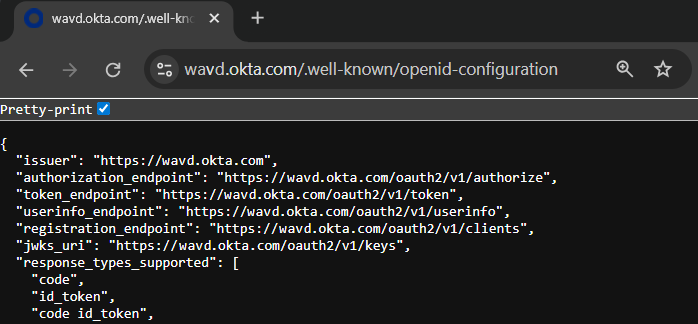
You can find the scope names through that same URL (if available) under the "scopes_supported" section. In most cases, you should configure openid, email, and, profile, and groups. However, there are some exceptions. For example you do not need to configure groups if connecting to Microsoft Entra. The names that you enter here must match the names of the scopes from your IDP provider. If the names do not match, certain features (like role mapping) will result in an error.
-
Configure the Attribute Mapping options.
While some providers might use the same attribute names as the default values provided by Avid, others might have different names for the same value. In these cases, you can map the default Cognito value (left column) to your IDP app's custom value (right column).
Some IDP apps might not include one or more default values (such as name). In this case you must create the attributes in your IDP app, and then ensure the names are correctly mapped in the ACC Control Panel.
Avid Content Core requires you to have correct mapping for both email and name (at minimum). You can use the Add Mapping button to include additional values if desired. However, these values might not be used by Avid Content Core.
-
You can find the Group Claim Name in your IDP app.
This value is likely already named "groups", which means that you should not need to alter this field. If your IDP app uses an alternate claim filter (name), enter that value both here and in the Scopes field above.
n In the case of Microsoft Entra, the Group Claim Name is entered as a GUID that relates to the GroupID claim name.
-
-
Click the Create IDP button to save your settings.
The site displays the OIDC Client Details window.
-
Connect to your ACC IDP app, and do the following:
-
Enter the Redirect URI and the Sign-out URL from the OIDC Client Details window to the app.
You can click the copy button to the right of each field to copy the value into your workstation's temporary clipboard.
-
Save your changes.
The OIDC Client Details window displays the names of the scopes as a reminder of your settings.
-
-
When you have completed the previous step, you can click the "I've configured my IDP" button in the ACC Control Panel.
-
(optional, recommended) Click the Test Federation button to verify your settings.
If you decide to skip this step, you can later test or edit your config from the Identity Provider Details page. For more information, see Reviewing Your IDP Configuration.
To configure a SAML-based identity provider:
-
Click the Create IDP button on the Identity Provider section of the portal.
The identity provider configuration wizard appears.
-
Enter a Display name for this IDP configuration setting.
This name is displayed on the Avid Content Core welcome screen for all users.
-
Click the SAML button to select this IDP type.
-
Enter an optional description of this provider into the Description field. This information appears only within the ACC Control Panel.
-
Enter the following information into the portal:
-
Find the Metadata URL from your IDP app and enter it into the SAML Configuration area.
-
Configure the Attribute Mapping options.
While some providers might use the same attribute names as the default values provided by Avid, others might have different names for the same value. In these cases, you can map the default Cognito value (left column) to your IDP app's custom value (right column).
Some IDP apps might not include one or more default values (such as name). In this case you must create the attributes in your IDP app, and then ensure the names are correctly mapped in the ACC Control Panel.
Avid Content Core requires you to have correct mapping for both email and name (at minimum). You can use the Add Mapping button to include additional values if desired. However, these values might not be used by Avid Content Core.
-
You can find the Group Claim Name in your IDP app.
This value is likely already named "groups", which means that you should not need to alter this field. If your IDP app uses an alternate claim filter (name), enter that value both here and in the Scopes field above.
n In the case of Microsoft Entra, the Group Claim Name is entered as a GUID that relates to the GroupID claim name.
-
-
Click the Create IDP button to save your settings.
The site displays the SAML Service Provider Details window.
-
Connect to your ACC IDP app, and do the following:
-
Enter the information provided in the SAML Service Provider Details window to the app.
You can click the copy button to the right of each field to copy the value into your workstation's temporary clipboard.
-
Save your changes.
-
-
When you have completed the previous step, you can click the "I've configured my IDP" button in the ACC Control Panel.
-
(optional, recommended) Click the Test Federation button to verify your settings.
If you decide to skip this step, you can later test or edit your config from the Identity Provider Details page. For more information, see Reviewing Your IDP Configuration.
Reviewing Your IDP Configuration
After you save your configuration settings, you can re-review those settings at any time through the Identity Provider Details page. From this page, you can review your existing configuration settings, edit or test those settings, or delete the IDP configuration from the portal.
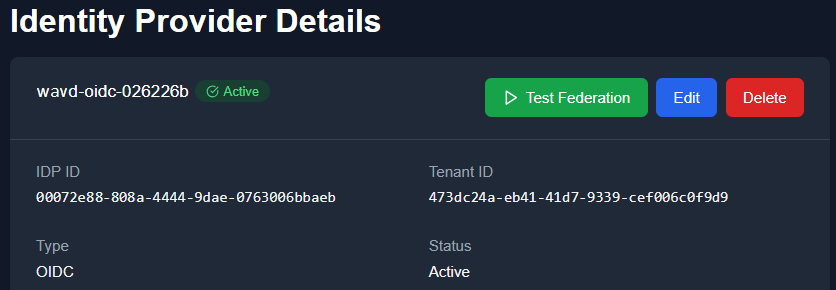
To use the Identity Provider Details page:
-
After signing in to the ACC Control Panel, click the View Details button to the right of your configured IDP.
You can return to the main menu by clicking the Back to IDP List button in the upper-left corner of the details page.
-
Do any of the following:
-
Click the Test Federation button to test your settings.
If the test passes, you should see a Test Federation Successful message at the top of the page.
-
Click the Edit button to change the settings for this IDP profile.
-
Click the Delete button to remove this IDP profile from your configuration.
The Control Panel displays a confirmation button that warns you that the delete operation cannot be undone. Click OK to confirm that you want to delete this IDP profile.
-