Configuring the Editor Output Settings
When you click the Render button in the Web Editor app, the system displays a list of output options that define the type of media outputs created. This panel allows you to define and customize those output templates.
After you create one or more Output settings, they appear as options in the Web Editor publishing workflow. The following illustration shows a system configured with multiple publishing endpoints and three output profile options (16:9 HD 1080p, Social Media 4:5, and Social Media Portrait 9:16).
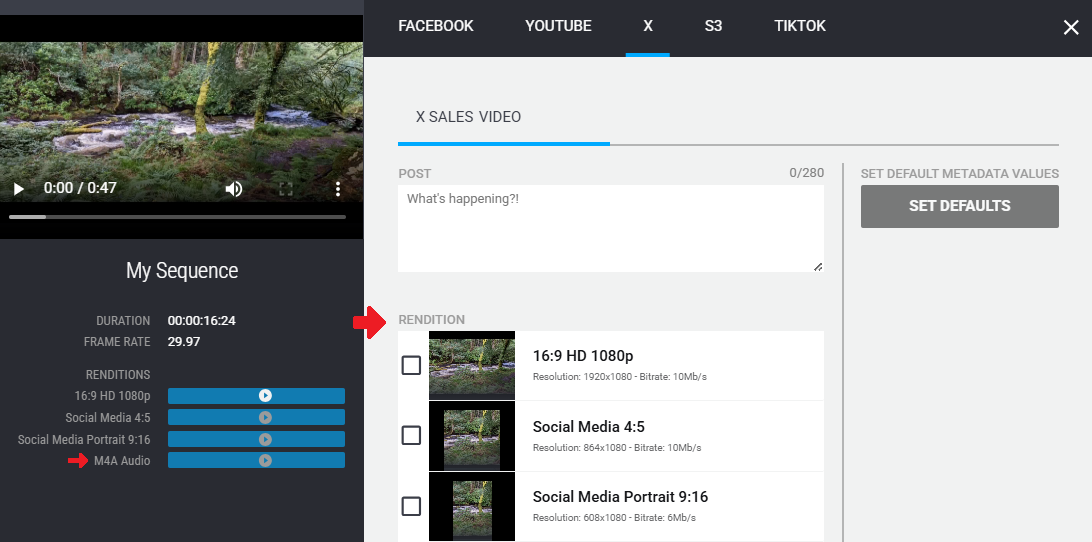
Notice that this illustration includes three possible X renditions, but the render process also created an M4A Audio output (as shown in the side panel in the left). That profile is not listed in the list of Renditions because it is not applicable to the X publishing endpoint.
Creating Output Settings
You can create as many Output profiles as necessary for your workflow. However note that when a user clicks the Render button in the Web Editor, the process creates media for every available profile. If you create a large number of profiles, the render process can take longer to complete.
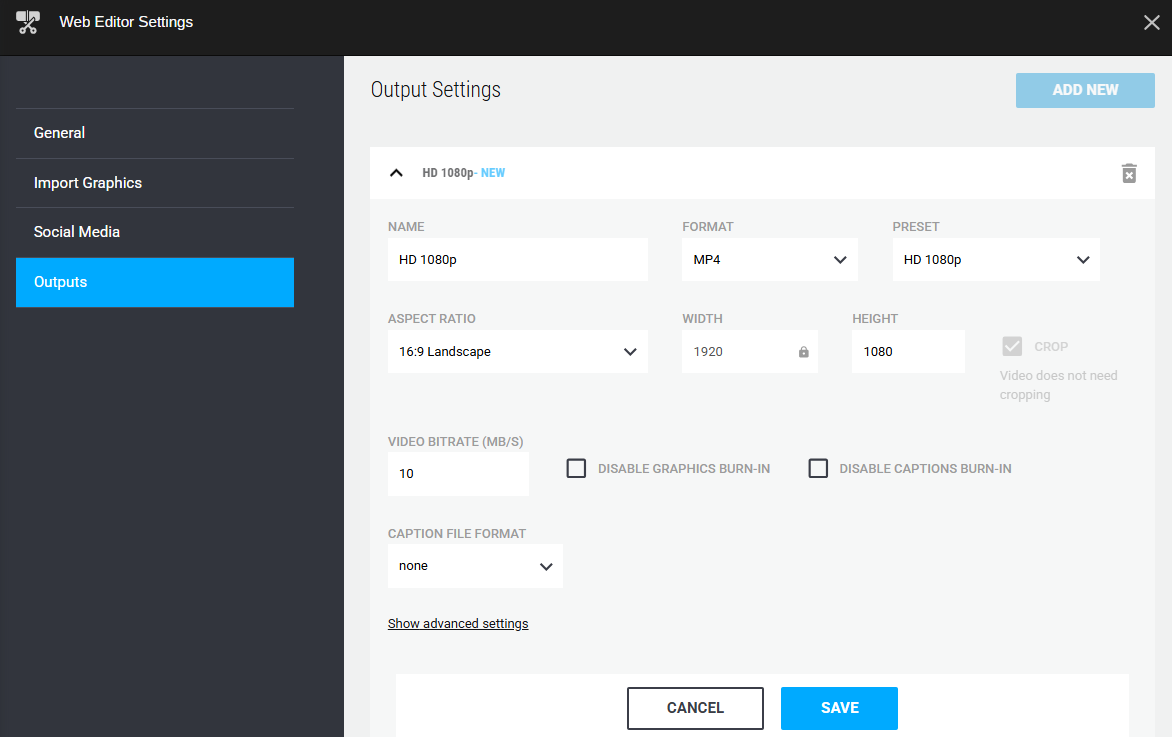
The following illustration and table provide more information about these settings.
|
Field Name |
Description |
|---|---|
|
Name |
The name of your Output setting. This value appears in both the Outputs section of the Administrator app, as well as in the Render output options in the Web Editor app. |
|
Format |
Use the menu to select either a video/audio format (MP4), or an audio-only format (M4A or MP3). If you select an audio-only format, many of the options described in this table are eliminated. |
|
Preset |
Use the menu to select one of the preset video formats. After you select a present, other values such as the Aspect Ratio, the Video Bit Rate, and others are updated automatically. These values are associated with this preset, but can be customized as needed. If you customize a preset, the Preset menu changes to display the Custom option. While this menu option becomes available after making updates to a preset, you cannot select the Custom option directly from the Preset menu. |
|
Aspect Ratio |
Select an aspect ratio for this setting. If you select the Custom option, the following fields are unlocked:
|
|
Video Bitrate |
Defines the video bit rate in Megabytes per second. Increasing this value can result in the creation of potentially higher quality, but larger MP4 files. |
|
Disable Graphics Burn-In |
If your sequence includes graphic elements (such as a title), enabling this check box eliminates those elements from your final output. |
|
Disable Captions Burn-In |
If your sequence includes a closed captioning track, enabling this check box omits the closed captioning from your final output. |
|
Caption File Format |
The Downloads area of the Outputs window includes a Download Captions area. This field defaults to None, but you can select any of the options from the menu to define a captions file format (for download). |
The output setting includes a list of Advanced Settings. You should only alter these settings if you are confident in knowing how these settings affect your output.
To create an output setting:
-
Select the Outputs option from the Web Editor Settings sidebar.
-
Click the Add New button under the Output Settings area of the panel.
The new Output Settings options appear.
-
Configure the settings per the information in this topic.
-
Click Save.
To delete an output setting:
-
Select the Outputs option from the Web Editor Settings sidebar.
-
Click the delete icon to the right of the output setting.
The app displays a Delete confirmation dialog window.
-
Click the Delete button to confirm the removal of this setting.
Creating Output Profiles
When you click the Render button to create an output of your sequence, the app's default behavior creates an output for each of the settings that you have created in this settings panel.
However, there might be times where you are creating a sequence for a specific purpose. For example, you might know that a particular sequence is created only to be posted to a 1:1 aspect ratio social media platform. In these cases, you can associate the sequence with a Render Profile that is associated with only a subset of your output options. By selecting a limited profile, you can expedite the creation of the specific output format(s) for this one sequence.
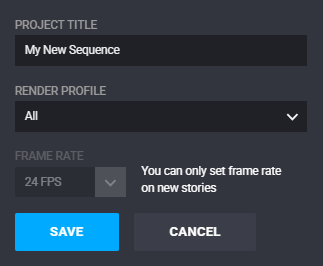
After you create a profile, the New Sequence window displays a Render Profile option (as illustrated below). The default selection in this menu is All, but you can select an alternate profile to limit the output options. If you do not create any profiles, this menu option is not displayed.
To create a render profile:
-
Select the Outputs option from the Web Editor Settings sidebar.
-
Click the Add New button under the Profiles area of the panel.
The new Profile options appear.
-
Enter a custom name for the profile.
This name appears in the Render Profile menu of the New Sequence dialog window.
-
From the Renditions pull-down menu, select an Output Setting.
-
Click the Add to this Profile button to add that setting to the profile.
-
(if desired) Repeat the previous two steps to add more settings to the profile.
-
Click Save.
To delete a render profile:
-
Select the Outputs option from the Web Editor Settings sidebar.
-
Click the delete icon to the right of the render profile.
The app displays a Delete confirmation dialog window.
-
Click the Delete button to confirm the removal of this profile.